Cleaning Services

How to Clean Window Frames and Sills

Keeping windows clean is an important part of home maintenance. It allows natural light to filter into the house and makes rooms appear larger and brighter.

Window Cleaning

To avoid streaks when washing windows, wipe with a lint-free cloth, such as a chamois or microfiber towel, or even a newspaper. When you finish cleaning the glass, buff away any streaks with a dry, lint-free cloth. Visit Website to learn more.

The frames around windows collect dirt, dust, and grime just as the glass does. To keep your home looking its best, it’s important to clean the frames regularly. To do this, you need a gentle yet potent cleaning solution that will safely remove dirt and residue from the frames without damaging them. Mix equal parts warm water and mild detergent to create the cleaning solution, then use it to wipe down the frames. Be sure to take your time and go over every surface of the frame, paying special attention to nooks and crannies where dirt often accumulates.

If your window frames are particularly dirty, try using a mineral deposit removing cleaner, such as CLR or Bar Keepers Friend. These products break down the oxidation caused by minerals in the water and allow you to scrub away stubborn dirt. If your frames are still dingy after using these products, you may need to use a stainless steel wire brush to scrub off the residue and stains.

Before you begin the actual cleaning process, use a vacuum cleaner with a crevice tool attachment or a cloth to clear out any loose dirt in the window tracks and frames. This will make the job much easier and ensure that the rest of your cleaning will be free from caked on gunk.

Afterwards, spray the track with a mixture of vinegar and water until it is thoroughly saturated. Wait a few minutes to let the vinegar and water react with each other, then use a paper towel to wipe down the entire vertical track from one end to the other. Repeat the process on the bottom track to ensure that you get all the gunk from the corners and grooves of each track.

After you’re done, use a lint-free cloth to dry the track and frame. This will prevent the growth of mold or mildew and also help to avoid unsightly streaks on your windows. To speed up the drying process, it’s a good idea to spray the track with water both before and after you wipe it down.
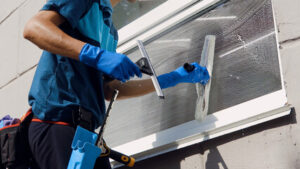
Clean the Glass

Using a dry lint-free cloth, either a microfiber or a terrycloth rag, wipe the glass from top to bottom. Immediately afterward, use another clean lint-free microfiber cloth to buff away any solution residue and remove streaks. Doing this quickly prevents the cleaning agent from drying and becoming difficult to remove. If you have more than one window to wash, it’s best to work on them in sections rather than all at once.

Avoid using paper towels, old rags or newspapers to clean windows. These materials can scratch or leave black ink smudges on glass surfaces. Instead, invest in reusable microfiber cloths that are super absorbent and washable. Alternatively, you can purchase a squeegee to help get the job done.

If you don’t have a microfiber cloth, a squeegee or a rag that is lint-free, use a soft abrasive sponge to rub the dirt and water off the glass. Then, use a squeegee to wipe the window dry. Be sure to rinse the squeegee between uses to prevent it from leaving behind dirty water marks on your windows.

For stubborn stains, try a mineral deposit remover such as CLR. If this fails, make a paste from water and cleaner that contains oxalic acid such as Zud or Bar Keepers Friend. Apply this to the affected area, let it sit for 15 minutes or so and then rinse it off. This may be necessary on exterior or insulated windows with heavy deposits of calcium or lime.

You can also use a de-ionized water spray or commercial cleanser to wash your windows and doors. This type of water is different from regular tap water and does not contain any ions that attract dirt, so your windows will stay clean longer. If you are cleaning a tall window, consider investing in a water-fed pole that allows you to spray or mop from the ground rather than standing on ladders. This method of washing your windows eliminates the need for chemical sprays that can contaminate the environment and cause toxic fumes. You can find these types of poles online or at some home improvement stores.

Clean the Sills

A window sill collects a lot of residue from the outside environment. A quick wiping down may refresh its appearance, but periodic deep cleaning is necessary for sanitation and to keep it looking like new. Unlike window tracks, a dirty sill will show dirt and dust on its surface and can harbor germs and other pollutants that can affect indoor air quality. For this reason, it is particularly important to keep window sills clean as part of your regular maintenance cleaning.

If you have wood window sills, start by brushing them to remove any loose debris and dirt. Then use a microfiber cloth or duster to wipe them down and make sure you get into all of the nooks and crannies. For stubborn stains, you can use a mild abrasive cleaner. Aluminum window sills are tough enough that water alone should be sufficient, but if you’re having trouble with a hard-water spot or mildew, you can use a gentle commercial cleaner formulated for this type of material.

For moldy window sills, you can try using a mixture of equal parts baking soda and water. Apply the paste to the affected area and let it sit for ten minutes. This will help to dissolve the mold and then you can wipe it away with a damp cloth. For hard-water stains, you can also try a mild solution of bleach and water in a spray bottle. This will kill any germs and prevent mold spores from growing.

Brick window sills should be cleaned the same way as a standard brick surface, although you may need to use a slightly more abrasive method to scrub stubborn stains and build-up. Brick is porous, so it can easily absorb substances from the surrounding environment that can stain and discolor it. For this reason, it is a good idea to thoroughly rinse the sill after cleaning and then wipe it dry with a clean cloth to prevent excess moisture from leading to mold growth.

In addition to being a magnet for dust, dirt, and debris, wood window sills can also become a breeding ground for harmful organisms such as mold and mildew. This is why it’s particularly important to clean them regularly and completely to protect the health of your family and guests.

Clean the Windowsill

The window sill is the structure that holds the glass panes of your windows in place. It is the most visible part of your windows, so it should be cleaned regularly to keep it looking its best. This is an easy task that can be done with a microfiber cloth and cleaning solution or even just vinegar.

Adding this to your regular cleaning routine will help prevent future mold and dirt buildup. To clean the sill, start by removing any larger, loose debris. This includes dust bunnies, dead bugs and twigs. A vacuum cleaner with a crevice tool attachment will work well to get the job done quickly and efficiently.

Next, you will want to remove any mold that has formed on the window sill. For this, you will want to use a solution of equal parts water and hydrogen peroxide (3%) in a spray bottle. This will effectively kill any mold on the surface of your window sill, as it is safe for wood and penetrates porous surfaces to kill any mycelium or spores. After sprinkling the solution on the affected area, let it sit for about 10-15 minutes. Then, using a scrub brush and warm soapy water, gently scrub the area, being sure to pay special attention to any nooks and crannies. Once you are finished, wipe away any leftover soapy residue with a damp microfiber cloth.

If you notice that there is still a lot of gunk stuck to the window track, you may need to put in some more elbow grease. This is where a scrub brush or sponge with a scrubby side comes in handy. This will help remove caked on dirt, which may include bird poop, tree debris or construction dust.

When the track is completely clean, use a lubricant to make it slide easily open and closed. Vinyl tracks can be coated with silicone lubricant, while wooden window tracks should be coated with a high-quality furniture wax.

It’s always a good idea to use non-toxic cleaners, as harsh chemicals may damage your window frames and sills. If you do want to use a commercial product, opt for a wood-safe cleaner like Pinesol. Be careful not to oversaturate the wood, as this can cause it to warp or crack.

General Contractor

What You Should Know About Deck Repair

Deck Repair Charleston SC require a professional eye to evaluate and decide on the best approach. Surface rot on planks, for example, may require removing and filling to prevent damage. Cracked or splintered boards can look unsightly and lead to further deterioration.

Tap any soft or loose board to see if it sounds wet or has water damage. Any water-damaged boards must be replaced.

Deck stairs are exposed to a lot of wear and tear. Daily use and extreme weather conditions like freeze and thaw cause wood to deteriorate, creating a safety hazard for anyone using them. Stairs can also become unstable, sink into the ground, or collapse. Inspecting stairs regularly for damage or signs of structural failure is critical to maintaining safety.

Keeping your deck stairs in good condition can add to the life of your deck. Proper maintenance and frequent cleaning will help reduce the need for repairs, but when necessary, a professional contractor should be called to perform a deck repair job. Often, simple, timely deck repair efforts like securing a loose railing or replacing rotten stair treads will save you from more expensive and time-consuming repairs in the future.

When estimating deck stair replacement or repair costs, several factors determine pricing. Wood types, design, and size are all influential in the final price of a project. For instance, pressure-treated stringers are the cheapest option, while more durable Douglas fir or cedar costs a little more. Stairway width is also a consideration; wider stairs are easier to maneuver and can add comfort and convenience to your deck at a minimal cost increase.

Most deck stair repair jobs involve repairing or replacing treads and stringers, but some include other features such as landings or benches. These features can increase material and installation costs but may be worth it if your yard landscape lends itself to their inclusion.

In addition to repairing and replacing treads and stringers, deck stairs should be thoroughly inspected for a variety of issues, including:

Loose steps are a major tripping hazard, especially when the treads no longer lay flat. They can be hard to spot, but every open board and nail should be repaired as soon as they are noticed. Changes in temperature and humidity can cause boards to expand and contract, resulting in nails that come loose. These loose boards can easily be tripped on my shoes or barefoot, causing injury to the person making the trip. Checking for signs of moisture penetration, like rot and mildew growth, is also important.

As the name implies, deck railings provide safety and security for those using your deck. They can also add to the aesthetic appeal of your deck. If you find the wood or metal railings on your deck are rotten, loose, or otherwise damaged, it’s time to replace them.

If the wood railings are loose, the solution may be as simple as tightening the carriage bolts that hold them in place. Open hardware is a common problem with wooden decks, especially in coastal areas where salt water can accelerate the corrosion of metal compounds. Periodic tightening can help, but if the problem continues, consider replacing the hardware with resilient, corrosion-resistant alternatives like stainless steel or galvanized hardware.

Metal railings can suffer from the same problems as wood, but if you have a composite railing, this type doesn’t rust and requires much less maintenance than wood. Wood railings can become shaky over time due to shrinkage and expansion or because the wood is rotten. Wooden railings are prone to warping, which can be corrected by applying wood glue and re-nailing the rail.

It’s also important to check the anchoring screws or bolts in the base plates of metal railing posts. These are often buried under the surface, and they can become loose over time. Please ensure these fasteners are secure by driving them back in with a drill or ratchet.

If your deck has a metal baluster, you can play with the plumb by shimming the top or bottom of the post where it sits on the rim joist. This will require significant cutting of the railing and a good bit of skill, but it can work. Be sure to use galvanized lag bolts with healthy-sized washers on both ends that go through the post and rim joist.

If the railing is completely rotted, remove the old spindle and any bits and pieces holding it in place. Measure and cut a new one and nail it into place. Then, caulk around the seam to prevent water from getting in and cause further damage. If you’re replacing the entire railing, look for pre-built sections of wood or composite railings at your local hardware store that can be installed with minimal effort.

The deck surface and railings are the parts that most often need repair, but the deck’s substructure also can show signs of deterioration. This can include sagging or bouncing and may also indicate a structural problem like wood rot. In these cases, a full deck replacement is likely necessary, as these issues can be dangerous and lead to structural damage in the future.

Generally, it is a good idea to invest in repairs when necessary to protect the life of the decking and keep it looking beautiful. This is especially true regarding pressure-treated lumber, which can benefit from regular resealing and restaining. However, there is a line that needs to be drawn when the cost of repairs becomes similar to or even exceeds the cost of a new deck. In this case, a full deck replacement is often the best option for homeowners.

One of the most common reasons for a full deck replacement is pervasive rot in the joists, beams, or posts. This can cause the structure to sag or even fall apart, which is dangerous for anyone using the deck. In many cases, these problems can be prevented by regularly inspecting the deck and fixing any issues immediately.

Another common sign that it’s time to replace your deck is if the deck boards are starting to warp or split. This indicates that the deck’s substructure is weakened, causing the boards to buckle or bend. Investing in a professional inspection and repairs can help prevent these problems and extend the life of your deck boards.

While a deck can be resurfaced to look brand new, it is not a good idea to try this on structures with extensive wood rot or other serious structural problems. This will only prolong the life of your deck for a few years and may make it more expensive to do a complete replacement in the long run.

A good way to determine whether it’s time to replace your deck is to ask yourself how much longer you want to use the space and if you think it will increase in value in that time frame. If so, a new deck is an excellent investment that can pay for itself in less time than you might expect.

Deck boards are prone to warping from rain and sun exposure. You can sometimes pry warped boards back into shape or flip them so that the undamaged, flat side faces upward for a permanent fix. If warping is widespread or accompanied by other signs of damage, however, you may need to replace the boards altogether. Whether or not you choose to replace the board, be sure to seal the area afterward to prevent future problems.

Your deck’s surface can also be damaged from weathering and age. In some cases, a good scrub and a new stain are all it takes to make the surface of your deck look brand-new again. Just be sure to use a stain designed for your type of decking—a natural fiber brush works well with pressure-treated wood, while a medium-stiffness nylon brush is ideal for composite boards.

Many issues can cause your deck to sag or feel unsafe beneath your feet, including loose railings and floorboards. If you find loose railings, it’s generally a simple matter of replacing the fasteners; however, this might not be enough to address a sagging deck caused by the structural joists themselves.

Loose floorboards are another common issue that can be addressed by removing and replacing the boards. However, if the problem is widespread and there are other signs of damage, such as wood rot, splintering, or a soft, spongy feel underneath your feet, consider a total deck replacement.

A sagging deck can pose safety risks, but you can often get it back in shape by replacing the joist hangers that connect the structural joists to the deck’s beams. To do this, carefully inspect the deck for corroded joist hangers and replace them as needed.

Ultimately, the most important factor to remember regarding your deck is that regular maintenance is the best way to keep it looking and functioning at its best. Regular cleaning, scrubbing, and staining can help protect your deck from the elements, and keeping furniture and planters away from the surface can minimize moisture build-up that can lead to rot.

Roofing

Repairing Your Home’s Roofing

Roofs are complex structures that protect us from rain, snow, extreme temperatures and sunlight. A person who builds or repairs them is called a roofer.

Roofing

The structure of a roof is determined by the material used to cover it. Simple, lightweight materials such as asphalt shingles require little support while heavy tile roofing needs substantial reinforcement.

Your roof is one of the most important parts of your home. Not only does it protect your property from the elements, but it can also add to your home’s curb appeal. There are many different roofing materials, and determining which is best for you depends on your architectural style and climate. It is important to consider your budget as well, as certain materials are more expensive than others.

Wood shingles or shakes are a traditional roofing material that offers a rustic, hand-crafted look. They are made from cypress, red cedar, or pine and are usually milled into uniform lengths and thicknesses. These types of roofs need regular maintenance to prevent moss or dryness, and they can be quite costly.

Clay tiles are another natural roofing material. These are molded and fired for durability, and they can withstand extreme temperatures. These types of roofs are commonly found in the desert and coastal regions, and they tend to absorb less moisture than other roofing materials.

Slate is another durable roofing material that can withstand high winds and temperature fluctuations. It is an eco-friendly choice that adds value to your home, but it is expensive and requires a specialist to install.

Asphalt shingles are another popular roofing material for homes. These are available in a variety of styles, with some even mimicking other roofing materials like slate and cedar. The three-tab asphalt shingle is the most economical option, while architectural and premium shingles are thicker to create a layered look on your roof.

Metal roofing is another popular option that can last up to 50 years. It is a good choice for flat or low-slope roofs, and it can be molded to look like other roofing materials. Aluminum, steel, and copper models are durable and resistant to fire and rain.

Green roofs are becoming increasingly common, and they are an excellent way to manage water runoff, cool a building, and provide habitat for wildlife. These types of roofs are an investment, however, and they require regular maintenance to keep them looking their best.

Installation

Roofing protects against rain, snow, sunlight, wind, and extreme temperatures. It comes in a wide variety of forms and shapes to serve aesthetic, technical, or economic considerations.

Installing a new roof is a major undertaking that requires special safety precautions. It’s best to hire a professional contractor who is licensed, bonded, and insured. Look for one who specializes in your chosen type of roofing, has a proven track record, and is willing to provide local references. Some manufacturers offer programs that credential contractors as “experts” in installing their products; such contractors may have received more training than others.

Be sure to ask about the flashing (a thin metal material that seals joints, such as those around chimneys, vents, skylights, and walls) and ridge ventilation systems. These can help prevent leaks, promote air circulation in the attic, and reduce moisture buildup. It’s also important to waterproof the valleys, which are the areas where the slopes of the roof meet.

Maintenance

A roof is an important part of a building’s structure that protects against rain, snow, sunlight, extreme temperatures and other weather conditions. Proper maintenance of a roof helps extend its life and reduces the need for expensive repairs.

Roofing maintenance includes regularly inspecting the structure for signs of wear and tear, making repairs as needed and clearing away debris. Performing maintenance at least twice per year, including in the spring and fall, can help detect small problems before they become major issues. Ideally, a maintenance checklist should be tailored to the specific needs of each type of roof.

Inspecting a rooftop can include looking for areas of damage and deterioration, such as cracks, openings, or crazing. These areas need to be repaired immediately. Other important inspections focus on the condition of caulking and flashing, which is the thin material installed around chimneys and where different roof planes meet. Replacing the caulking and repairing the flashing will help prevent leaks.

Large trees should also be trimmed on a regular basis, especially if they are near the roof. This can prevent tree limbs from falling during heavy storms and natural disasters.

Other maintenance tasks include keeping gutters free of debris and scupper boxes (small drainage channels), which are used to drain rainwater from the roof. Inspecting the flashing on a chimney and vent pipes will also help reduce leaks. Look for areas where the caulking has become discolored, or that are starting to lift up, and address these issues right away.

A rooftop can also benefit from being cleaned to remove algae, mildew, lichen, and moss growth. These can affect the durability of the shingles and lead to rot and corrosion. Also, regular cleaning can help prevent the buildup of dirt and grime, which can cause abrasions on shingle surfaces. A qualified roofing contractor can recommend a cleaner or suggest a cleaning solution that will work best for each individual roof.

Repairs

Whether your roof is old and worn or new and in need of some attention, it’s essential to address problems before they become worse. Repairing leaking areas, missing or damaged shingles, sagging areas and damaged flashing will help to ensure that your roof is water-tight and strong, protecting the underlying structures of your home. In addition, repairs to your roof can improve energy efficiency by reducing air leaks and making the home more comfortable.

A roof inspection can catch problems before they escalate into major damage, reducing the need for expensive replacements. A good roofing contractor will inspect the entire roof to identify any problem areas, including hidden issues like deteriorating sealants and loose or damaged shingle tabs.

Before you begin any roofing repairs, be sure to gather the right tools for the job. A roofing tool kit should include a pry bar, a hammer, a nail puller, shears and a utility knife. You’ll also need a ladder and a bucket for collecting debris. Tarps and magnetic tools will also come in handy for picking up metal objects that have fallen off the roof.

The first step in repairing a roof is to examine the condition of the underlayment, which is the layer of protective material that lies directly beneath your shingles. This is usually made of plywood or oriented strand board (OSB). A roofer will look for soft spots in the underlayment and replace any that are rotting. They will also examine the flashing and sagging areas for signs of water damage.

Leaking or water damaged areas should be repaired as soon as possible. The underlying materials will be harmed if left unattended, and the moisture can creep into the living areas of your home, encouraging mold and mildew growth. A professional roofer will use a variety of methods to repair these areas, including caulking, re-sealing and replacing sections of the roof.

Another important aspect of a roofing repair is adding insulation. This will make your home cooler in the summer and warmer in the winter, thereby lowering your energy bills and contributing to the environment. Professional roofers will be able to recommend the best type of insulation for your home and climate. You may also be able to find local, state or federal rebates for installing insulation in your home.

Bathroom Remodeling

Commercial Building Bathroom Remodeling

Clean bathrooms are an important sign of a business that cares about customers and employees. Stains smells, and broken fixtures contribute to low morale and decreased productivity.

Consider installing water-saving features, like sink aerators and touchless faucets. Milwaukee Bathroom Remodeling will help save energy and money while impressing eco-conscious clients and employees.

bathroom remodeling

Nothing gives away the age of your building like an outdated and rundown commercial bathroom. Upgrading this space is an excellent way to boost morale and productivity. In addition, many sustainable bathroom design innovations are available to save energy and money. These include touchless faucets, sink aerators, waterless urinals, motion sensors, automatic dispensers, and hand dryers. These fixtures can help reduce utility bills while improving sanitization for customers and employees.

Before beginning your remodel, decide what aesthetic you want to achieve. This will guide the design and product selections. For example, if your business has a sophisticated and neutral color palette, you will want to match that in the bathroom design. For high-traffic areas, durable materials that withstand wear and tear are a good choice.

Once you have a clear idea of what you want, it’s time to find a reputable contractor to handle your project. Interview a few contractors and ask to see examples of their work. Also, ask to meet in person to discuss your project and determine acceptable working hours and timelines. Once you’ve found a contractor, get a written bid outlining the scope of work, budget, and material selections.

Many commercial bathrooms relocate plumbing and electrical. This can significantly increase renovation costs as contractors must ensure the new installation meets all applicable building codes. This also means hiring a professional who understands local building codes, permitting procedures, and board approvals, if needed.

It’s important to use durable materials that can withstand heavy usage. This includes faucets, toilets, and showerheads. These materials should be easy to wipe down and not harbor bacteria or germs. The layout should also be thoughtfully designed to avoid any nooks or crannies that are difficult to clean.

Lastly, consider using energy-efficient lighting and fixtures. The latest technology in bathrooms is designed to reduce water and electricity usage. This is a great way to save money and protect the environment.

Nothing dates a building or turns off customers and guests like outdated bathrooms. A commercial bathroom remodeling project is a cost-effective way to give your building a fresh, updated look and improve the comfort of your visitors and employees.

If you are considering a commercial bathroom renovation, it’s best to begin planning the process early. Finding a contractor, obtaining permits, and ordering the necessary materials can take a few weeks. If you have a tight deadline for completion (for example, for an event or new tenants), communicate this with your contractor. This will help ensure the renovation is completed on time. Additionally, it’s important to remember that lead times for certain items may be longer during peak season or after a holiday. Having this information ahead of time can reduce the risk of unexpected delays or costly overtime.

If your remodel requires a new electrical circuit, having a licensed electrician perform the work is best. They can ensure your wiring is up to code and safe for your employees and customers. A bathroom renovation often involves adding or replacing outlets and switches, so a licensed contractor can ensure these new features are installed properly and pass inspections.

If the only thing being replaced is a shower, tub, sink, or toilet, you don’t need a permit or inspections. But, for more extensive remodeling, or if you plan to expand the room by moving walls or changing the floor plan, you’ll likely need to obtain a permit and inspect your work. A licensed general contractor will know what’s required and when and will be able to coordinate the various subcontractors you’ll need to complete your commercial bathroom remodel.

Another aspect of commercial bathroom remodeling that often needs to be addressed is a washer/dryer installation. If your building’s alteration agreement allows it and there’s enough space, a washer/dryer unit can add significant value to the property and make things more convenient for employees and clients. If you’re planning to install a washer/dryer, your Sweeten contractor will need to be able to reconfigure the floor plan or knock down walls to accommodate it. For example, in a recent Sweeten remodel, the Sweeten contractors added a washer/dryer to a 24-square-foot half bath by rearranging the floorplan and taking over two adjacent closets.

Be prepared for your business to be disrupted during a commercial bathroom remodel. Preparing for this is important, so I need to make a schedule and budget for the project and set up alternative restroom arrangements.

Commercial bathrooms require a lot of attention to detail to ensure accessibility for people with disabilities and to meet ADA standards. Whether you run a gym, locker room, spa, hotel, office building, or other business, your bathroom remodeling project may include installing accessible vanities, grab bars, and showers with ADA-compliant entryways and handrails. This is an opportunity to create a more comfortable and family-friendly bathroom for your employees, members, guests, customers, and visitors.

Before renovations begin, it is a good idea to review your plans with your contractor to ensure all the details are covered. This includes a scope of work, timelines, and costs. Having all of this in writing can help protect you and your contractor in case there are unexpected delays or changes to the project that add to the cost.

The demolition phase is the most disruptive part of a remodel because it involves tearing down walls, flooring, and other surfaces. This can take several days to a week, depending on the room size and what is being removed. It’s important to cover furniture and other items to prevent damage during this time, as dust and debris can travel everywhere.

Once the demolition is complete, drywall and floors are installed. Depending on the materials used and the room size, this can also take a few days to a week. Once the drywall and floors are completed, painting and trim can be finished.

This is also a great time to upgrade your fixtures and appliances to energy-efficient options that will save money over the long term, reduce waste and water usage, and improve sanitization for your customers. Sink aerators, touchless faucets, waterless urinals, and motion-sensitive lighting are all available and can reduce operating costs while helping to keep your facilities green.

Once the demolition and construction phases are complete, it is time to install your new commercial bathroom products. You’ll want to be prepared for some disruption and dust during this phase, so planning how the work will be handled is important. This includes having enough supplies, scheduling deliveries on time, and limiting the number of people working in each restroom.

This is also the time to put in any new toilets and bidets that need to be replaced or added. Make sure to consider the size of each bathroom and how it will fit in the space before making a purchase.

You’ll also need to install toilet partitions. This requires additional plumbing and drywall installation, so you must hire the right contractors. Depending on the size of your bathrooms, this could be a lengthy process, so it’s best to have a timeline and budget set in place before beginning this step.

Bathroom hardware sets, sinks and faucets, cabinet handles, recessed shower lighting, and vanity mirrors are some of the main items that need to be installed. Adding new medicine cabinets, towel bars, and robe hooks is also a good idea. You’ll also want to update the bath fan, switch plates, dimmer switches, and outlet covers as needed.

Adding some final touches will help your remodeled commercial bathroom stand out. Consider including relaxation features like calming scents, soothing music, and touch-free technology. Adding premium towels and bathrobes is another great way to add comfort and luxury. You can even add a few indoor plants or wooden accents to give the room a spa-like feel.