Home Improvement

Find the Perfect Shower Door Style for Your Bathroom Makeover

The options for Shower Doors are plentiful and diverse. From grand frameless doors that make one feel as if they are within the castle walls to framed and semi-frameless doors, a multitude of styles doth exist for every discerning homeowner.

Shower Doors

Choosing the right Entry Doors Atlanta for you shower door can elevate your bathroom aesthetics. It also offer an immersive experience to help you find the perfect option for your space, consider your unique needs and design style.

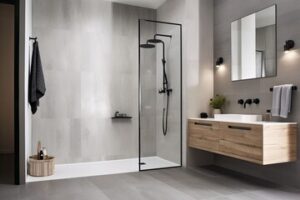
With a minimal metal frame, this door style maximizes the view of the shower interior. Frameless doors are also easier to clean, and can reduce the risk of mold and mildew. However, they can cost more than framed doors and require custom installation.

Like framed doors, frameless shower doors come in a variety of styles and finishes. They can be curved or straight, and they may be coated in a protective surface. They can be hinged or anchored to the wall with clips. Some manufacturers offer “smart” hinges that automatically adjust to the size of the glass.

Choosing the right shower door for your home requires consideration of the size and shape of your bathroom, as well as the decor you’ve chosen. The type of glass you choose will determine how much light comes into the room, and a clear or tinted finish will affect visibility. In addition, the door’s track and hardware will determine how easy it is to open and close.

The biggest drawback to frameless doors is the increased price and complexity of the installation process compared with framed doors. Since the tempered glass is heavier and thicker, it’s important to make sure your contractor has experience installing this type of shower enclosure. A poorly installed door can leak and damage surfaces in your bathroom, leading to costly repairs.

Both framed and frameless doors can last 20 to 30 years with proper care, including daily wipe downs after each shower, and monthly deep cleaning to prevent soap scum build up. In addition, a glass protection coating such as Diamon-Fusion will keep water deposits, minerals and dirt from building up on the surface, which will reduce your cleaning time significantly.

While framed doors have been known to shatter, this is very rare and usually the result of an accident or defect in the glass, improper transportation or installation, or extreme or abrupt temperature change. Although tempered glass is designed to break into rounded pieces rather than jagged shards, these pieces can still cut you if they hit your body. This is why it’s important to always use caution when entering and exiting the shower, never slam or bang the door, and to inspect the doors for cracks and damage regularly.

Framed

Shower areas are important part of most bathrooms, and many homeowners choose to install doors instead of a curtain for a more polished look. There are various configurations and styles of shower doors, but they generally fall into two categories: framed or frameless. Both have positive and negative attributes that should be considered before choosing which style to buy for your bathroom remodel.

Framed shower doors have a metal or plastic frame around the edges of the glass, and they are available in a variety of finishes to match your bathroom decor. They are also available in different shapes and sizes to fit your shower stall. They are typically cheaper to purchase than frameless shower doors, but they may have less versatility in terms of design.

These shower doors can be made of tempered glass or frosted glass, and they can be treated for easy cleaning. They can be installed on a sliding track or as swinging doors that open in one direction using a piano hinge. The disadvantage of this type of shower door is that it tends to collect water underneath the bottom track, which can lead to corrosion of the metal and promote mildew growth. It can also be difficult to clean because soap scum may build up on the track where it meets the wall.

Framed shower doors are easier to install than frameless ones because the glass is lighter and the frames have premeasured openings that fit most shower stalls. However, the frames can be heavy and require special tools to mount. The installation process may take longer if the frames need to be cut or trimmed, and caulking is often needed between the frame and the wall to keep water from leaking. In addition, framed doors can be more expensive to buy than frameless ones because they are often manufactured in mass quantities in overseas factories. They are usually designed to fit a range of widths, and they can be a lower quality than custom-made doors. They are commonly sold to DIYers and builders who are on a budget.

Pivot

Pivot shower doors have a unique design that allows them to open inward and outward, unlike hinged doors. They can be framed or frameless and come with a variety of glass textures, sizes and options for privacy and functionality. They also have a number of hinge options in color and metallic finishes which allow you to match your bathroom décor.

Frameless shower doors have the advantage of offering a clear view and a seamless appearance in your bathroom. They can be used in any type of shower enclosure, whether it’s a walk-in tub or a standard shower stall. They’re easy to clean and offer a more modern style. They can also be installed on a corner shower if you have enough space to accommodate one.

They have a smooth surface and don’t require any tracks, which makes them easier to maintain than sliding doors. They’re also less likely to catch water or dirt, which could lead to mold and mildew growth. However, they can be more difficult to open than other types of shower doors. They’re also not as sturdy as other styles, so they may not be suitable for older or handicapped people.

Like all shower doors, pivoting doors should be made of tempered glass to ensure safety and durability. Tempering is a process that involves applying controlled thermal or chemical treatments to the glass, which increases its strength and hardness. This makes it more durable than regular plate glass, which can splinter into jagged pieces. In addition to the glass, there are several shower base options available including acrylic, expanded polystyrene, cultured marble and tile.

Choosing the right shower door for your bathroom will depend on several factors, including the layout of the room and your personal preferences. A hinged or bypass door will work well in smaller shower stalls, while French doors may be a better option for larger spaces. However, the most important factor is choosing a style that will be both functional and beautiful in your bathroom.

Fixed

One of the most common kinds of glass shower doors for bathrooms is a fixed glass door. This is a modern design that can be fabricated into smaller sizes, making it ideal for small bathrooms. It also comes in bi-fold designs that allow the door to open and shut for comfortable entry. Fixed doors are available in a variety of glass types and finishes to complement any bathroom decor. Some are even frosted for privacy or have a patterned finish to add visual interest. These doors can be easier to keep clean since they do not have any nooks and crannies for dirt to collect in.

There are many different types of hinges that can be used to support a fixed shower door. You will want to find a durable and reliable option that can handle the weight of your doors. Look for hinges that are made from stainless steel or another hardwearing material. You will also want to consider whether or not you want a self-closing door hinge, which can help prevent water leakage after each use. Some hinges are designed specifically for neo-angle or corner shower stalls, which may require more stability than a standard hinge.

The minimal frame of a fixed shower panel makes it an elegant addition to your home. It creates a clear separation between your shower space and the rest of the bathroom, which can elevate the overall aesthetic of your bathing area. Additionally, the glass shower panel takes up less floorspace than a sliding door or a frameless pivot door, making it an excellent choice for cramped spaces.

For homeowners who are concerned about the environmental impact of their renovations, fixed glass shower doors may be a good choice. This is because they are made from recycled materials, such as sand, limestone, and sodium carbonate. Additionally, they are non-toxic and have a low-carbon footprint.

Insurance

What Is Life Insurance?

Life insurance protects your family against financial hardship in the event of your death. You can choose from various types of policies, including level term and increasing term policies, which provide protection for a specific period of time. You can also choose whole, universal, or variable universal life insurance policies that provide permanent coverage and accumulate cash value over the years.

Insurance

Life insurance is a type of insurance policy that pays a lump sum, or death benefit, to your beneficiaries if you die. It is not required, but many people purchase it to provide financial protection for their families. It can also help pay for funeral costs, debts, and other living expenses. There are several different types of life insurance policies available, allowing you to find one that meets your needs. Visit https://www.legacylifeinsured.com/ to learn more.

Some insurance companies will only sell you a policy if you pass a medical exam and answer questions about your health and habits. This is known as underwriting, and it’s a critical step in the application process. The underwriter considers your age, sex, family health history, occupation, and lifestyle. The insurer may also request a medical record from your doctor. If the underwriter approves you for a life insurance policy, they will issue a contract and charge you a premium.

There are several different types of life insurance, and each has its own benefits and drawbacks. Term life insurance provides coverage for a limited amount of time, and it is usually cheaper than whole life insurance. However, it does not accumulate any cash value and will expire at the end of the term. Other types of life insurance include universal life, variable universal life, and indexed universal life.

All of these types of policies have different features, but they all work the same way: they collect regular payments from the insured in exchange for a death benefit when the owner dies. Those payments are known as the “premium”. You can choose to pay these premiums on a set schedule or at a certain point, like when you’re married.

Other life insurance options include permanent life insurance and accidental death & dismemberment (AD&D). Permanent life insurance allows you to earn interest on the cash value component of your policy, while AD&D covers you for specific accidents that can result in serious injuries.

The death benefit from a life insurance policy can be used to cover your debts, provide income for your children or grandchildren, and fund your retirement. However, it is important to understand the limitations of these policies before purchasing them. Some policies may exclude coverage for specific situations, such as suicide or homicide. In addition, some policies have a contestability period, which voids coverage if you misrepresent your health or omit important information.

It pays a death benefit

The death benefit of life insurance provides a cash payout to your beneficiaries at the time of your death. This money can be used to pay for funeral expenses, debt, or any other expense the beneficiaries choose. It can also be used to provide financial support and stability for your family after your death. The amount of the death benefit depends on the policy and your premium payments. You can prioritize building cash value or obtaining a larger death benefit when designing your policy with an agent.

If you are engaged in dangerous activities, like skydiving or driving racecars, you should consider getting an accidental death benefit rider on your life insurance policy. This will allow you to qualify for an accelerated death benefit (ADB) in the event of an accident that occurs while engaging in the activity. This will reduce the total death benefit your beneficiaries receive, but it can help you afford expensive medical care if needed.

When a claim is submitted, the life insurance company will review the documentation and confirm that the policyholder has died. It will then place the death benefit funds on deposit for the beneficiary in an interest-bearing checking or draft account. The beneficiaries can withdraw the funds at any time. However, they should be aware that if they withdraw more than the death benefit amount, the total amount of the deposit will decrease in accordance with the rate declared by the company.

It can take several months for a beneficiary to receive the death benefit. This is due to the fact that some policies pay out in installments or annuity-type contracts, rather than a lump sum. In addition, state laws and policy details can delay payment. For example, suspected fraud or a death caused by suicide can trigger an investigation and prolong the payout process.

Some life insurance policies have a two-year contestable period, which means that the insurance company can deny the death benefit if it learns the policyholder gave incorrect information on the application or committed suicide. However, the insurance company must return the premiums paid by the financing entity.

It is tax-free

The death benefit from life insurance is generally tax-free for your beneficiaries. However, the cash value in some permanent life insurance policies may have taxes attached to it. This is because the IRS considers it interest income. This may affect the amount your beneficiary receives if you withdraw or borrow from the cash value of your policy.

Whole life insurance and index universal life insurance can include a cash-value component that grows tax-deferred, similar to an investment account. This allows the money to grow more quickly than if it was being held in an ordinary savings or bank account. In addition, some whole life policies also pay dividends to the policyholder. These are not considered income in the same way as the interest earned on a deposit or certificate of deposit, and can be used to reduce premiums or buy additional coverage.

In most cases, the cash value of a life insurance policy will accumulate without being subject to taxes until it is withdrawn or you surrender it. During this time, the accumulated funds earn interest based on the type of account they are placed in. For example, a indexed universal life (IUL) policy can credit your cash value with interest based on an underlying index. Moreover, this is often more than the amount of interest you would get from a traditional savings or bank account.

If you surrender your policy, you will be required to pay taxes on any excess of the accumulated cash value over the cost basis in your policy. The excess is typically taxable at a capital gains rate, although this can be reduced if you use the proceeds from the sale to purchase another similar life insurance policy under a 1035 exchange.

Many whole life insurance policies also offer the option to take a loan from your policy’s cash value. Unless you cancel the policy before repaying the loan, the amount repaid will be taxable at your current tax rate. You should consult with a financial professional before making this decision. Taking a policy loan or withdrawal will decrease the death benefits and cash value of your insurance, which could cause it to lapse or become an MEC.

It is a long-term investment

Many people use life insurance as a long-term investment, and it can provide a variety of benefits. It can help your loved ones pay for funeral costs and debt, and it can also help you reach financial goals in retirement. The key is to choose the right type of policy and to use it in conjunction with other investments and savings.

Life insurance policies with cash value are a good investment tool for people who want to build up a nest egg. A portion of your premium goes toward the cash value, which grows over time. You can borrow against this amount or withdraw it if you need to. However, if you take out too much money, your policy will lapse.

Permanent life insurance is another option for investing, but it can be expensive and has some risks. It offers a death benefit and cash value component that can be used to supplement your income in retirement, but it is not guaranteed to grow or pay out at all. You can also invest in a permanent life policy with a variable universal or indexed universal plan, which allows you to invest the cash value into different sub-accounts. These can include stocks and mutual funds.

Term life insurance is cheaper than permanent life insurance, but it does not offer the same flexibility and benefits as permanent life policies. It can be a good choice if you have significant debt or a spouse who depends on your income. It can also cover final expenses and estate taxes.

While life insurance may not be the best investment, it is a safe and convenient way to save for the future. It’s a great choice for those who can’t afford a savings account or don’t have the time to manage a portfolio. However, you should always speak with a financial professional before purchasing a life insurance policy. They can help you find a suitable plan and determine how much coverage you need. They can also recommend the right investment strategy for your unique situation.

Plumbing

Plumbers and Sump Pumps

Plumbers Stroudsburg PA install and repair the pipes and fixtures that carry water, gas, and waste into and out of homes and businesses. They follow blueprints and building codes to ensure the correct placement and connection of components.

plumber

Plumbers need to have good listening skills to understand their customers’ concerns and troubleshoot problems. They also need strong mechanical skills to fix complex plumbing problems.

A sump pump is an essential plumbing device that helps prevent water damage in your basement or crawl space. Plumbers are skilled at installing, repairing and replacing these pumps for homeowners. They will also install a backup pump as a safety measure in case of power outages or failure of the primary pump.

A professional plumber will start by excavating the area where the pump is going to be located in your basement or crawl space. They will dig a hole in the ground and fill it with gravel for stability and to allow water to easily flow into and out of the pit. They will then place the sump pump into the pit and secure it. Plumbers will also add a check valve and a discharge hose to the pump. The hose will lead outside and away from your house, keeping the water out of your home.

When the plumber is finished, they will turn on the pump and make sure it works properly. They will test it by pouring water into the sump pump until the float arm rises and activates the pump. They will then observe how the pump turns on and off, how it discharges water through the hose and whether any debris like gravel or lint are clogging the hose or its exit point outdoors.

Once they are satisfied that the pump is working correctly, they will connect a PVC pipe to the discharge port on the pump. This requires a male and female pipe adapter, which the plumber will attach to each other by applying glue to the end of the male adapter and then inserting it into the female adapter on the pump. They will then use a wrench to tighten the connection.

The plumber will then inspect the discharge pipe and make sure that it is directing water away from your foundation. They will also check that the drain line is free of obstructions and that it slopes away from your home to keep water from returning back into the basement. They may also recommend a backup battery or sump pump in case of power outages.

Sump Pump Maintenance

One of the best ways to ensure that your sump pump is always ready for a heavy storm is to perform a simple, routine inspection and cleaning. During this maintenance, it is important to make sure that the discharge line is properly pitched so that water is carried away from your home, and that all exterior drainage pipes are free of obstructions. It is also important to regularly test your sump pump to ensure that it is functioning correctly. Simply dump a bucket of water into the sump pit, and verify that the float switch is activating and pumping as it should.

During this time, you should also give the interior and exterior PVC discharge pipes a thorough visual inspection to make sure that no cracks or disconnection have occurred. A lack of pitch in the discharge pipe or a buried line with no proper flow can lead to problems during winter freeze/thaw cycles. In addition, it is a good idea to inspect the power cord and the ground fault circuit interrupter outlet (GFCI) that the sump pump connects to. GFCI outlets and cords should be checked on a regular basis to ensure that they are in good condition, so that they don’t trip during a storm.

Before performing any maintenance, you should make sure that the power is completely off, by flipping the breaker. It is also recommended that you unplug the pump from the discharge pipe, and remove it from the basin. This will allow you to clean the grate, inlet screen, and other components that are often covered with grime and sludge. Spraying the pump with vinegar can help to loosen and dissolve the gunk, making it easier to scrape off.

Once you’ve removed the pump, be sure to wrap it in plastic to prevent drips and spills as you clean it. First, use a garden hose to rinse off the unit. Then, scrub the inlet screen with a toothbrush and clean water to remove any caked on dirt or debris. Finally, check the owner’s manual to see if the unit requires lubrication of its bearings. If it does, then lubricate it with the recommended oil or grease.

Sump Pump Replacement

When it comes time to replace your sump pump, it is important that you use a professional plumber. The plumber can help you find a model that is the right size for your home and that will meet your specific needs. They can also install a battery backup for your sump pump, especially if you live in an area prone to storms and power outages.

Typically, your plumber will first shut off the power to your sump pump at the circuit breaker using a noncontact circuit tester. Then, they can remove the old pump from its pit and the discharge pipe. To make it easier to get your new sump pump in place, cut a piece of PVC pipe that is the same length as your discharge line and glue a male adapter onto one end. Then, thread the adapter-end of the pipe onto the new pump. Before you connect the pipe, be sure to turn the pump on and that the automatic float switch is activated.

Plumbers can also reroute the discharge pipes exiting your sump pump to reduce noise and improve flow. When water travels through these pipes, it can make gurgling sounds that are annoying for everyone inside the house. By changing the discharge pipe to a spring-loaded valve, you can eliminate these noises and create a smoother path for the water.

Having your sump pump properly installed will save you money and headaches in the long run. A plumber can also install a cover for your sump pump pit to reduce noise and keep kids and pets out. They can even install a tight-fitting cover that will let water out while still keeping debris and bugs out. Finally, a plumber can install a weep hole in your sump pump to prevent overflow and water damage to your home’s foundation. Be sure to check with your local building code and plumbing codes before making any changes to your sump pump. These rules will ensure that your plumber is using the right materials and following all necessary regulations to protect your home.

Sump Pump Repair

While it’s possible to do a little bit of routine maintenance on your sump pump, most jobs require professional plumbing skills and tools. If you notice any unusual problems, it’s a good idea to call a plumber for immediate attention and repairs.

If your sump pump turns on but doesn’t eject water, there may be an issue with the impeller or check valve. You should also check the discharge pipe to make sure it’s free of clogs and hasn’t frozen over.

A clogged sump pump can lead to costly flooding and property damage. Regularly cleaning the pump can help prevent debris from damaging the motor and blades. Unplug the pump and remove the lid to clean it out. Also, clean the intake screen located on the bottom of the unit. Be sure to remove any dirt, sand or gravel that has found its way into the sump pit.

Another common problem is a malfunctioning float switch. If the float switch gets stuck in a higher position, the pump will turn on and off frequently. A plumber can inspect the float switch and make necessary adjustments.

If you notice loud clanging noises coming from the pump, it’s likely because the discharge pipes are too long or have a lot of sharp bends. Plumbers can reroute the discharge pipes to eliminate these problems and make the pump quieter.

If your sump pump won’t turn on, make sure it has power by plugging it into a different outlet. You can also open the basin lid and manually move the float switch up and down to see if it engages. If the float switch doesn’t engage, it may be time to replace it. Finally, if your sump pump is constantly running but does not eject water, there may be an electrical problem. A plumber can check the float switch and motor and install a larger pump if necessary. If the sump pump is plugged into an extension cord, it’s time to invest in a dedicated outlet for the pump. This will protect the outlet from tripping and ensure it always gets proper voltage.

Roofing

Covering Your Home: Understanding the Basics of Residential Roofing

Residential Roofing involves the installation and repair of roofs on homes. These roofs protect a home from weather elements and add curb appeal. They are available in a variety of styles, materials, and colors.

Roofing

Asphalt shingles are popular because of their affordability, durability, and easy installation. They are fire resistant and reflect heat, which can reduce utility bills. For professional help, contact Lexington Roofing.

A residential roof is one of the most important parts of a home. It protects the house from severe weather conditions, critters, and natural decay. It also increases the value of a home and boosts its energy efficiency. However, a new or repaired roof can be expensive. Therefore, you should carefully research the cost of residential roofing and find a reputable and affordable roofing company.

The cost of residential roofing depends on the type of material and the design. The most popular roofing material is asphalt shingles, which are inexpensive and durable. Other options include metal, tile, slate, and wood. There are also eco-friendly options that are more environmentally friendly and cheaper than traditional materials. The cost of residential roofing also depends on the size and location of the property.

Residential roofing contractors provide installation, repair, and maintenance services for homes. They are often needed to restore old or damaged roofs and can help with a variety of tasks, including repairing leaks, adding gutter systems, and replacing shingles. A good contractor should be licensed and insured. He should also have a track record of providing quality service.

The design of a residential roof can vary greatly depending on the homeowner’s preferences and budget. For example, some homeowners prefer a flat roof, while others prefer a sloped roof with a parapet wall. In addition, the roof should be able to accommodate HVAC units and vents. A good contractor will be able to advise the homeowner on the best design for their roof.

Moreover, the design of a residential roof can be influenced by the style of the house. A roof should match the overall design of the house and blend in with its surroundings. For this reason, it is important to choose a color that will not clash with the house’s exterior. Also, it is a good idea to consider the climate of the area when choosing a roof. For example, a shingle roof can be a good choice for colder regions, while a metal roof is suitable for hotter areas.

Whether you are looking for a residential roofing contractor or a commercial roofing company, make sure to do your research and find the best contractor for your needs. Be sure to compare costs and ask for a written estimate before hiring anyone. This will help you avoid hidden costs and ensure that the job is completed properly.

Materials

When it comes to residential roofing, there are many different materials homeowners can choose from. Each type of material has its own benefits and drawbacks. The choice you make should depend on a number of factors, including lifespan, durability, cost, maintenance and weather resistance. The right material will also add to the aesthetic of your home.

Traditional asphalt shingles are the most popular roofing option for residential homes. They are affordable and come in a variety of colors and styles. However, they have the shortest lifespan of any roofing material and don’t offer as much insulation.

Fiberglass shingle roofs are another popular choice for homeowners. They are durable, watertight and easy to maintain. They are also a good option for homeowners who want to reduce their energy costs. However, they have a lower lifespan than other roofing materials and are more susceptible to damage from hailstorms.

Metal roofing has gained popularity in recent years due to its durability and longevity. It can be made of a wide range of metals, including aluminum and steel. It is also available in a variety of colors and can be installed on any type of home. However, metal roofs are heavier than shingle roofs and may require a stronger framing system.

Concrete tile roofs are a great way to add style and texture to your home. They are available in a variety of colors and can withstand high temperatures. They are also long-lasting and energy efficient, but they are more expensive than other types of roofing.

Wood shingles and shakes provide a natural look to your home. They are a good option for older and historic-style homes, but they need regular maintenance and can be a fire hazard. They are also less durable in wet climates and must be treated with fire retardants and chemical preservatives.

Slate is a highly durable roofing material that can last a lifetime. Its color is determined by its mineral and chemical makeup, which makes it a popular choice for many homeowners. However, slate is also one of the most expensive steep-slope roofing materials and requires a sturdy home to support its weight.

Installation

When you need residential roofing, the best option is to hire a professional contractor to do the job. This will ensure that the roof is properly installed and protects your home from the elements. Residential roofing contractors are experienced in the various types of roofing materials and can offer advice on what will best suit your needs. Some of the most popular residential roofing materials include asphalt shingles, metal, and tile. Each type of roofing material has its own benefits and drawbacks. For example, metal is more durable than shingles and can withstand high winds. However, it can be more expensive than other types of roofing materials. Wood shingles have a rustic look and can provide insulation, but they may require more maintenance than other types of roofing.

The process of installing a new residential roof begins with removing the old shingles and underlayment. This is done carefully to prevent damage to the roof decking. The underlayment is then inspected for any damage or wear and tear, and it is replaced if necessary. Then, the new roofing material is installed over the underlayment. It is important to accurately measure the square footage of your roof before ordering roofing materials. This will ensure that you get the right amount of material and avoid unnecessary waste.

After the roof is installed, it’s important to ensure that it is properly ventilated and insulated to keep moisture out and regulate indoor temperatures. In addition, it’s crucial to ensure that rainwater is directed away from the roof and into gutters or downspouts. If water pools or puddles on the roof, it can cause structural damage and leaks. It is also important to install flashing around chimneys, skylights, and other vulnerable roof features.

A residential roof is a vital part of any home. It keeps the interior of your house protected from the elements, and it also enhances curb appeal. There are many factors to consider when choosing a residential roof, including cost, aesthetics, and durability. It is also important to choose a roofing contractor who has experience in the industry and can provide quality service.

Maintenance

Residential roofing is a significant investment, and homeowners should follow routine inspections and maintenance procedures to ensure that it lasts. These procedures help prevent leaks and other damage, and can save money by reducing the need for repairs. They also help protect the value of a home and attract potential buyers. A well-maintained roof can also increase the comfort of a home, by regulating indoor temperatures.

The most common type of residential Roofing is shingles roofing, which can be made from asphalt or fiberglass. This type of roofing is the most affordable and durable, and it can last up to 20 years. If you choose to install a shingle roof, make sure it has proper ventilation to avoid moisture buildup.

Another important component of a residential Roofing is flashing, which helps keep water away from vulnerable areas of the roof. These include valleys, dormers, chimneys, skylights, and vents. It is important to inspect the flashing regularly and replace it if it becomes worn or damaged. It is also important to check for cracks in the sealant around these areas, which may cause leaks.

Leaks are the most common problem with residential Roofing, and they can be difficult to identify. Homeowners should inspect their roofs periodically for damage and wear, and hire a professional to conduct a comprehensive assessment of the condition of the roof. This will help them spot problems and identify the best time to schedule repairs.

While a homeowner can do some general maintenance on their own, it is recommended to have a professional inspect the roof at least once per year. This will allow the professional to identify and repair any problems before they become more severe. This is especially important in regions with extreme weather conditions or for older roofs.

Condominium associations can hire a contractor to perform regular maintenance on their condominium roofs. These contractors can provide a variety of services, including cleaning and repairing the roof surface, gutters, downspouts, and vents. The contractors can also check for signs of leaking, damage, or debris and remove any accumulated materials. They can also ensure that the condo roof is properly ventilated to reduce the risk of mold growth.

Concrete Contractor

Revitalize Your Concrete: A Comprehensive Guide to Repairing and Restoring

Some cracks require a professional’s expertise, such as large, deep, or wide cracks or cracks that compromise the integrity of a building’s foundation, floors, or walls. Other cracks may be repaired by the homeowner using the proper materials.

Concrete Repair

A construction-grade, polyurethane concrete repair sealant. It self-levels to a foot-traffic-ready finish and is moisture-cure. It resists temperature extremes and soil heaving. For professional help, contact Concrete Repair Eau Claire.

Concrete is a marvelous material, but over time it can deteriorate and crack. When this happens, a quick and relatively inexpensive solution is to use self-leveling concrete. The trick is to make sure you are using the product correctly, and that it is appropriate for your situation.

Self-leveling concrete can be used to fill cracks or fill joints in horizontal concrete surfaces, such as driveways, sidewalks, patios, garage floors, and above ground foundations. This type of concrete sealant contains a high-grade polyurethane and has a low VOC content, which makes it environmentally friendly. The sealant is also water resistant and durable, making it ideal for long-term applications.

When applied correctly, the concrete crack filler will not only restore the appearance of your concrete, but it will protect the structural integrity of the slab as well. It can also be painted to match the surrounding color of the concrete. Before applying self-leveling concrete, it is important to ensure that the surface is clean and free of debris. You will also need to make sure that the area is not exposed to heavy foot or vehicular traffic until it dries.

Depending on the brand of concrete sealant you choose, it may have different curing instructions. Some will be ready for use within 12 hours, while others will require up to 48 hours before you can begin to use them. The environment where the self-leveling concrete is being applied will also affect the curing process.

Both concrete caulking and self-leveling concrete are used to seal cracks in concrete surfaces. Concrete caulking is thicker than self-leveling concrete, and it is able to stop moisture from getting into cracks, which can cause the concrete to break down. Concrete caulking can be used to repair small cracks, as well as large cracks in a concrete floor or wall.

Self-leveling concrete caulking is similar to concrete sealant, except it is thinner and more runny. It will not flow through cracks or holes in the concrete, but it can be sprayed on and smoothed with a trowel for a finished look.

Concrete Patching Mix

Concrete patching mixes are a great way to take care of minor cracks and holes before they turn into major problems. When using concrete patching mix, it is important to follow the directions on the label and apply it to a clean surface. It is also important to allow the patching mix to cure properly.

When used correctly, a concrete patching mix can be a cost-effective solution to many common issues with concrete surfaces. If you are experiencing issues with your concrete and would like to learn more about how it can be repaired, reach out to a professional. They can help you decide whether repairing or replacing the concrete is the best option for your home or business.

Concrete patches can be applied to a variety of surfaces, including masonry, concrete, stucco, and even some wood. They are typically easy to use, but some require specialized equipment and technical expertise. A concrete repair company can help you determine which product is right for your needs and provide a professional installation.

This concrete patch is designed to repair cracks and holes up to 1/4″ deep in a wide range of indoor and outdoor concrete, masonry, and stucco surfaces, such as garage floors, sidewalks, patios, and driveways. It can be applied to horizontal or vertical surfaces, and it can be painted or sanded after drying. It is not recommended for areas that will be driven on, however.

This product requires much less water than traditional concrete patch products, and it is ideal for patching small pock marks, spalling, and minor surface damage. It is very easy to use, and it provides a long-lasting, durable repair. It can be applied to vertical or overhead surfaces, and it is available in a variety of colors to match your existing concrete. This product is also low-odor and non-toxic. It is a good choice for residential and commercial applications, and it is available in both powdered and liquid form. It is also available in a convenient kit that includes everything you need to make your repairs. This kit makes it easy to create a professional-looking finish.

Concrete Repair Materials

When it comes to concrete repair, the material used is just as important as the proper preparation of the surface. The right materials can ensure a long-lasting and effective repair. The key is choosing a repair material that’s strong enough to support the design loads, durable to resist the effects of weathering, and economical for both initial cost and ultimate service life.

Cement-based repair materials are widely used for repairing concrete structures, which is attributed to their good compatibility and bonding strength with the existing substrates. Most of them contain Portland cement (PC), sulphoaluminate cement, blast furnace slag or silica fume as binders and aggregates. In addition, the use of fibers and modification with organic materials can enhance the performance of these repair materials.

Proper surface preparation is the linchpin of successful repairs. This includes cleaning, profiling and saturating the substrate to bring it to a “Saturated Surface Dry” state. This is necessary to prevent the absorbed moisture from diluting the repair material or causing weak spots and voids in the repaired surface.

Moisture in the concrete substrate can significantly affect the cement hydration and microstructure of the repair material and influence the interfacial bond property between repair material and old concrete. Courard et al. [78] found that the water content of the substrate affected the moisture transport and influenced the bond strength between a special concrete mortar and the existing concrete.

A variety of methods have been applied to improve the bonding strength between concrete repair materials and the substrates, including sandblasting and the use of polymer-based coupling agents. Moreover, the roughness of the substrate surface can significantly enhance the shear strength of the interfacial bond. A number of studies have investigated the effect of different surface removal techniques on the shear bond strength between the repaired concrete and the substrates, such as slant shear tests and pull-out test. Among the studied methods, sandblasting and the use of the polymer-based coupling agent had a better bond strength than the other tested surfaces. Besides, slant shear tests and the pull-out test have also been used to evaluate the shear bond strength between geopolymer repair mortar and old concretes.

Concrete Repair Contractors

Concrete repair contractors have the expertise and experience to identify the root cause of a concrete problem. They can then use the appropriate remediation techniques to restore a concrete surface or structure to its original condition. This may include crack repair, patching, resurfacing, and concrete strengthening. They can also help protect concrete from future damage by applying protective coatings.

The type of concrete repair required will depend on the type and extent of the damage. In cases where structural integrity is compromised, concrete repair contractors can reinforce the affected area using epoxy injection or carbon fiber reinforcement methods. They can also use concrete leveling to fix uneven surfaces. This is a technique that involves drilling small holes and adding concrete under the damaged section until it is level.

Some examples of repairs that require the expertise of a concrete repair contractor include expansion joints, large cracks, and cracked or spalling concrete. It is important to address these issues as soon as possible, as they can lead to serious problems.

In addition to repairing structural issues, concrete repair contractors can also provide services such as concrete leveling, resurfacing, and joint sealing. These services are essential for maintaining the functionality and beauty of a concrete structure. They can also help prevent future damage by addressing any environmental factors that may be causing it to deteriorate.

A professional concrete repair contractor will have the proper equipment to handle any type of concrete project. They will also have access to high-quality materials that will ensure a quality finish. They will be able to recommend the best products and materials for your specific situation.

Concrete structures are exposed to a wide range of environmental conditions and chemicals that can lead to deterioration and corrosion. If the underlying cause of the damage is not addressed, it can lead to expensive repairs or replacements.

Specialty concrete repair contractors can perform many types of structural repairs including post-tension repair, concrete leveling, concrete resurfacing, carbon and glass fiber reinforcement, structural concrete strengthening using alkaline or cathodic solutions, waterproofing, and cathodic protection. They can repair residential buildings, industrial facilities, water towers, concrete silos, airport runways and taxiways, railroad bridges, DOT bridges, and power plant foundations.

Cleaning Services

How to Clean Window Frames and Sills

Keeping windows clean is an important part of home maintenance. It allows natural light to filter into the house and makes rooms appear larger and brighter.

Window Cleaning

To avoid streaks when washing windows, wipe with a lint-free cloth, such as a chamois or microfiber towel, or even a newspaper. When you finish cleaning the glass, buff away any streaks with a dry, lint-free cloth. Visit Website to learn more.

The frames around windows collect dirt, dust, and grime just as the glass does. To keep your home looking its best, it’s important to clean the frames regularly. To do this, you need a gentle yet potent cleaning solution that will safely remove dirt and residue from the frames without damaging them. Mix equal parts warm water and mild detergent to create the cleaning solution, then use it to wipe down the frames. Be sure to take your time and go over every surface of the frame, paying special attention to nooks and crannies where dirt often accumulates.

If your window frames are particularly dirty, try using a mineral deposit removing cleaner, such as CLR or Bar Keepers Friend. These products break down the oxidation caused by minerals in the water and allow you to scrub away stubborn dirt. If your frames are still dingy after using these products, you may need to use a stainless steel wire brush to scrub off the residue and stains.

Before you begin the actual cleaning process, use a vacuum cleaner with a crevice tool attachment or a cloth to clear out any loose dirt in the window tracks and frames. This will make the job much easier and ensure that the rest of your cleaning will be free from caked on gunk.

Afterwards, spray the track with a mixture of vinegar and water until it is thoroughly saturated. Wait a few minutes to let the vinegar and water react with each other, then use a paper towel to wipe down the entire vertical track from one end to the other. Repeat the process on the bottom track to ensure that you get all the gunk from the corners and grooves of each track.

After you’re done, use a lint-free cloth to dry the track and frame. This will prevent the growth of mold or mildew and also help to avoid unsightly streaks on your windows. To speed up the drying process, it’s a good idea to spray the track with water both before and after you wipe it down.

Clean the Glass

Using a dry lint-free cloth, either a microfiber or a terrycloth rag, wipe the glass from top to bottom. Immediately afterward, use another clean lint-free microfiber cloth to buff away any solution residue and remove streaks. Doing this quickly prevents the cleaning agent from drying and becoming difficult to remove. If you have more than one window to wash, it’s best to work on them in sections rather than all at once.

Avoid using paper towels, old rags or newspapers to clean windows. These materials can scratch or leave black ink smudges on glass surfaces. Instead, invest in reusable microfiber cloths that are super absorbent and washable. Alternatively, you can purchase a squeegee to help get the job done.

If you don’t have a microfiber cloth, a squeegee or a rag that is lint-free, use a soft abrasive sponge to rub the dirt and water off the glass. Then, use a squeegee to wipe the window dry. Be sure to rinse the squeegee between uses to prevent it from leaving behind dirty water marks on your windows.

For stubborn stains, try a mineral deposit remover such as CLR. If this fails, make a paste from water and cleaner that contains oxalic acid such as Zud or Bar Keepers Friend. Apply this to the affected area, let it sit for 15 minutes or so and then rinse it off. This may be necessary on exterior or insulated windows with heavy deposits of calcium or lime.

You can also use a de-ionized water spray or commercial cleanser to wash your windows and doors. This type of water is different from regular tap water and does not contain any ions that attract dirt, so your windows will stay clean longer. If you are cleaning a tall window, consider investing in a water-fed pole that allows you to spray or mop from the ground rather than standing on ladders. This method of washing your windows eliminates the need for chemical sprays that can contaminate the environment and cause toxic fumes. You can find these types of poles online or at some home improvement stores.

Clean the Sills

A window sill collects a lot of residue from the outside environment. A quick wiping down may refresh its appearance, but periodic deep cleaning is necessary for sanitation and to keep it looking like new. Unlike window tracks, a dirty sill will show dirt and dust on its surface and can harbor germs and other pollutants that can affect indoor air quality. For this reason, it is particularly important to keep window sills clean as part of your regular maintenance cleaning.

If you have wood window sills, start by brushing them to remove any loose debris and dirt. Then use a microfiber cloth or duster to wipe them down and make sure you get into all of the nooks and crannies. For stubborn stains, you can use a mild abrasive cleaner. Aluminum window sills are tough enough that water alone should be sufficient, but if you’re having trouble with a hard-water spot or mildew, you can use a gentle commercial cleaner formulated for this type of material.

For moldy window sills, you can try using a mixture of equal parts baking soda and water. Apply the paste to the affected area and let it sit for ten minutes. This will help to dissolve the mold and then you can wipe it away with a damp cloth. For hard-water stains, you can also try a mild solution of bleach and water in a spray bottle. This will kill any germs and prevent mold spores from growing.

Brick window sills should be cleaned the same way as a standard brick surface, although you may need to use a slightly more abrasive method to scrub stubborn stains and build-up. Brick is porous, so it can easily absorb substances from the surrounding environment that can stain and discolor it. For this reason, it is a good idea to thoroughly rinse the sill after cleaning and then wipe it dry with a clean cloth to prevent excess moisture from leading to mold growth.

In addition to being a magnet for dust, dirt, and debris, wood window sills can also become a breeding ground for harmful organisms such as mold and mildew. This is why it’s particularly important to clean them regularly and completely to protect the health of your family and guests.

Clean the Windowsill

The window sill is the structure that holds the glass panes of your windows in place. It is the most visible part of your windows, so it should be cleaned regularly to keep it looking its best. This is an easy task that can be done with a microfiber cloth and cleaning solution or even just vinegar.

Adding this to your regular cleaning routine will help prevent future mold and dirt buildup. To clean the sill, start by removing any larger, loose debris. This includes dust bunnies, dead bugs and twigs. A vacuum cleaner with a crevice tool attachment will work well to get the job done quickly and efficiently.

Next, you will want to remove any mold that has formed on the window sill. For this, you will want to use a solution of equal parts water and hydrogen peroxide (3%) in a spray bottle. This will effectively kill any mold on the surface of your window sill, as it is safe for wood and penetrates porous surfaces to kill any mycelium or spores. After sprinkling the solution on the affected area, let it sit for about 10-15 minutes. Then, using a scrub brush and warm soapy water, gently scrub the area, being sure to pay special attention to any nooks and crannies. Once you are finished, wipe away any leftover soapy residue with a damp microfiber cloth.

If you notice that there is still a lot of gunk stuck to the window track, you may need to put in some more elbow grease. This is where a scrub brush or sponge with a scrubby side comes in handy. This will help remove caked on dirt, which may include bird poop, tree debris or construction dust.

When the track is completely clean, use a lubricant to make it slide easily open and closed. Vinyl tracks can be coated with silicone lubricant, while wooden window tracks should be coated with a high-quality furniture wax.

It’s always a good idea to use non-toxic cleaners, as harsh chemicals may damage your window frames and sills. If you do want to use a commercial product, opt for a wood-safe cleaner like Pinesol. Be careful not to oversaturate the wood, as this can cause it to warp or crack.

Cleaning Services

How To Clean A Gutter Properly

Gutter cleaning is a crucial home maintenance task that can help your roof, siding, and foundation last longer. Follow these Gutter Cleaning Sarasota ideas to make the process more efficient and less messy.

To start, use a plastic bucket with a metal handle. Cut and bend the ends of the handle halves into hook shapes that can be hooked over the edge of the gutter as you work.

gutter cleaning

Use A Ladder

Clean gutters prevent water damage to the roof and walls of a house. While cleaning them can be a dirty and dangerous job, it is important to do it regularly to keep the gutters functioning properly.

The first thing you need to do is choose the right ladder for the job. It needs to be sturdy enough to support your weight and the extra load of tools and gutter-cleaning attachments that you will need to carry up it. It should also be tall enough so that you can reach the areas that are hard to access.

Once you have the right ladder, find a safe place to set it up. Ideally, it should not be leaning against the gutters themselves. Putting the ladder against them can cause the gutters to rust or become warped over time, so it is best to work in another area.

If you cannot do this, then use a ladder stabilizer to ensure that the ladder stays stable while you work. Also, make sure that the ground underneath the ladder is free of rocks and other debris that could cause you to trip.

Start at the top of one gutter and work your way down it, scooping out the gunk with a gutter scoop or other plastic shovel and placing it in a bucket. Then, rinse the gutters with a hose and flush out the downspouts.

Repeat this process until you have cleaned all the gutters on your property. Then, do a final inspection to make sure that there are no leaves or other debris left behind.

Once the gutters and downspouts are completely clean, it is a good idea to test them by pouring water down them. If it is clogged, you will need to use one of the many gutter-cleaning clog removal products on the market or call in a professional to dislodge the blockage. It is a far better and safer option to call in a professional to do this for you, however. Then, you can relax and enjoy a clean gutter that will not be overflowing with mucky by-products next time a storm rolls in.

Scoop Out Debris

If your gutters are clogged with leaves, branches, and other debris, you will need to remove them manually. This is best done from a ladder, and it’s important to use the right type of ladder for your job. A good ladder should be stable and easy to maneuver so that you don’t have to lean too far while you work. It’s also a good idea to have a spotter to help stabilize the ladder and ensure your safety. It’s important to wear gloves while cleaning your gutters, as the debris can be sharp.

Begin by finding the downspout opening and clearing away any large branches or twigs that might pose a clog threat. Next, work your way along the gutters, using a gutter scoop or garden trowel to scrape away the loose debris. You can also use a long paint stir-stick to break up and remove larger dirt clods that are stuck to the gutter. Once the gutter is clear, dump the debris onto a tarp lying on the ground below you. It is also a good idea to have a garbage bag or trash can nearby to collect the debris as you go.

To avoid the risk of falling off a ladder, you should always wear sturdy shoes while working and keep three points of contact on the ladder at all times. Ladder-related falls account for several deaths and injuries every year, so be sure to follow proper ladder safety. If possible, use a four-legged ladder for one-story structures and an extension ladder for taller ones.

Another effective method for gutter cleaning is to vacuum out the entire system with a gutter vac. This will allow you to reach more areas of the gutter and is also much faster than scooping. Be sure to vacuum the downspouts as well, as they can often become clogged with debris like leaves and twigs. Make sure to follow proper safety measures when using a gutter vac, such as wearing a harness and tethering the tool to a secure point in the house.

Fill a Bucket

For more stubborn clogs, you can try using a garden hose to wash away the gunk. Start at the end of the gutter closest to the downspout, and use the hose’s spray nozzle to push water over the debris. This will help to dislodge the blockage and may even reveal leaks in your roof or fascia boards. Be careful not to spray your house shingles, though, as this can cause them to peel or blister.

If you notice that the hose is getting too dirty to work effectively, switch it out for a fresh nozzle. This will help to keep the hose from clogging while still cleaning your gutters. For added convenience, you can also purchase a telescoping gutter cleaning tool that attaches to your hose and can reach down into the gutter. These tools are particularly useful if you live in an area with lots of overhanging trees and have to clean your gutters frequently.

When you’re finished, check the downspout to make sure that it’s free of blockages. It should channel water down and away from your house, not toward it. If it’s not, you should consider installing downspout diverters to ensure that the water is moving away from your home instead of towards it.

Regardless of whether you’re using the hand trowel method or the gutter bucket technique, you’ll need to have some sort of place to collect the gunk that you’re scooping out of the gutters. You can make this job significantly easier by bringing up a bucket to place the debris in, rather than having to constantly move your ladder back and forth to do so.

Ideally, the ladder should have a paint-can shelf or hook that can hold your bucket, so you can just shovel the gunk into it and leave the ladder in position. This will allow you to clean several feet of gutter before having to climb down and reposition the ladder. It’s also a good idea to bring a pair of work gloves and safety glasses so that you don’t accidentally touch any twigs or leaves that are lying on the ground. You should also give power lines a wide berth while you’re working on the roof and ladder, since touching one can send electrical current coursing through your body and cause serious injuries.

Use A Tarp

Clogged gutters are more than just a nuisance; they can cause expensive problems such as fascia board rot, structural damage, and unwelcome insect visitors. The best way to avoid the cost of gutter repair and prevent costly structural damage is by cleaning them regularly.

Scooping out gutter debris seems to be the most efficient method of gutter cleaning, and a bright orange plastic “Gutter Getter” scoop can be purchased at most hardware stores. Gloves are also recommended to protect hands against dirty, rotting leaf debris that often contains bird, pigeon, and squirrel droppings that are ridden with bacteria. Work gloves also protect from the torn metal shards that often plague old gutters, which can poke or cut hands inadvertently.

If a homeowner chooses to use a ladder for cleaning gutters, the best time is usually early in the morning or late afternoon when the sun has had time to dry the roof. It’s important to always be careful while climbing a ladder, and it’s best to never step up past the second-to-last rung. It’s also a good idea to have a spotter to help stabilize the ladder when it’s in position.

While cleaning gutters, it’s important to take the time to inspect them for signs of damage or potential issues that may need to be addressed. For example, if gutters are missing pieces, it’s a good idea to have them replaced. If the gutters are loose, it’s a good idea to tighten the gutter hangers.

Another great time to check the condition of a home’s gutters is during a rainstorm. If the gutters are clogged, it’s important to clean them out before the next storm occurs. This will help prevent water from backing up onto the roof and causing leaks, as well as help prevent water from flowing into areas such as valleys, near chimneys, and heating, ventilation, and air conditioning (HVAC) equipment, which can damage the home.

A clogged gutter is more than just an inconvenience; it can be a serious issue that can cost a homeowner thousands of dollars in repairs. Gutters aren’t just an ugly home feature; they’re designed to protect the structure of a house and prevent expensive damage from pests, mold growth, and water leaks. And, as the saying goes, an ounce of prevention is worth a pound of cure.

Driveways

When it’s Time For a Milling and Asphalt Overlay

Asphalt Driveway is a durable, easy to repair and can add a significant amount of value to your home. However, when a crack or damage becomes extensive, it’s time for a milling and asphalt overlay or a new driveway.

Asphalt Driveway

Asphalt is a mix of cement and coarse mineral aggregate materials, such as sand or crushed stone. Its dark color hides fluid spills, and it’s easier to clean than concrete surfaces.

Asphalt is an economical and durable option for a residential driveway. It has a classic, clean look that complements many styles of homes. However, the cost of an asphalt driveway varies depending on the scope and size of the project. Some contractors may charge a flat fee, while others will have an hourly rate. You should find a contractor you trust, and ask for references before hiring them. It is also important to get a contract that clearly lays out the work and fees to be done.

A new asphalt driveway costs between $7 and $13 per square foot, including installation. The price is higher than a concrete one, but it’s a good investment because it has a longer lifespan. Additionally, it’s easy to maintain and can be repaired with relative ease.

The most significant factor in the cost of an asphalt driveway is the type of base material. The underlying layer must be stable and free of organic materials. A poor base will create sags and cracks in the asphalt, which can lead to early deterioration. To prevent this, use a coarse aggregate such as crushed stone or “conbit” (recycled asphalt and concrete) to provide a firm, settle-resistant matrix.

In addition to the underlying structure, the surface of the asphalt must be constructed to withstand heavy traffic. For this reason, it’s best to hire a professional paving company. The crew can install the driveway faster and at a higher quality than you could on your own. Plus, they have the tools and equipment to get the job done right.

The lifespan of an asphalt driveway depends on how it is used and maintained. To extend its life, you should keep cars and trucks off the driveway to minimize damage. You should also trim trees around the driveway to avoid tree roots crawling underneath the asphalt. You should also regularly seal the driveway to protect it from moisture and sun exposure. A well-maintained asphalt driveway can last 30-40 years. This is much more than the average lifespan of a concrete driveway, which is 20-30 years.

Durability

The lifespan of an asphalt driveway is generally much longer than concrete, depending on the quality of the installation, climate conditions, and usage. This is partially due to the fact that asphalt is more flexible than concrete and can better withstand freezing and thawing cycles. It also typically requires less maintenance than other types of pavement.

It is important to maintain your asphalt driveway to ensure it lasts as long as possible. Regularly blowing or sweeping the surface prevents the build-up of organic materials that can cause cracks and other problems. Additionally, sealing the driveway every few years can help keep it looking new and attractive.

When properly maintained, an asphalt driveway can easily last 30 years or more. However, it is not as durable as a paver driveway, which can withstand up to 40 years with minimal maintenance.

Like any type of pavement, an asphalt driveway can experience damage over time. This is often caused by weather conditions or heavy traffic. If the damage is not repaired immediately, it can lead to large cracks or even potholes. In order to avoid these issues, it is important to work with a reputable contractor and take steps to protect your driveway from damage in the future.

Asphalt is very porous, so it tends to soak up moisture. This can be a problem if you live in an area with frequent rainfall or snow. During rainstorms, water can flash flood the driveway and pick up oils, bits of tire rubber, and other debris. Over time, this can dry out the binders that hold the asphalt together and cause it to crumble.

A good asphalt contractor will use a steel-wheeled roller and a vibrating plate compactor to ensure the material is compacted well. The contractor should also use a tamper or lute to get into the corners and crevices to further compact the edges of the driveway.

Once your asphalt driveway has been paved, it is crucial not to drive on it for the first 72 hours. Vehicles can cause significant damage to the freshly poured asphalt and disrupt the smooth finish. You should also avoid parking any vehicles on your asphalt driveway for up to 14 days after the paving process. Doing so will add extra weight to the fresh asphalt and may leave deep depressions in the driveway that can eventually become cracks.

Maintenance

A well-maintained asphalt surface adds value to a home or business. It also improves curb appeal and enhances safety. It is also less expensive to repair minor damage than to have an entire driveway or parking lot repaved. In addition, a well-maintained driveway or parking lot looks more appealing to potential buyers and is a great way to show that the property owner cares about the condition of their home or business.

Maintenance requirements for asphalt driveways include sweeping, hosing down, and power washing the surface to remove debris. This will prevent dirt, leaves, and other materials from clogging the asphalt and causing premature wear. It is recommended that this be done every month or two to ensure the longevity of the pavement.

It is also important to keep the area free of weeds, which can be abrasive to asphalt. It is best to remove weeds as soon as they appear, because they can cause cracking and separation of the surface layer from the subgrade. Crack filling is another maintenance task that should be performed regularly. This helps to prevent minor cracks from turning into larger crevices that could cause water infiltration and lead to further deterioration of the surface.

Other maintenance tasks for asphalt driveways include checking for drainage problems and removing standing water. It is important to keep the surface dry to prevent damage to the asphalt and the underlying soil. In some cases, a drainage system may need to be installed to help with this problem.

Keeping your asphalt driveway in good condition will not only save money, but it will also increase the overall value of your home or commercial property. It will also make it easier for you to sell your property in the future. A well-maintained asphalt surface is a welcome sight for potential buyers and can give them the confidence that they will enjoy their new home or business for years to come.

In some cases, it may be necessary to hire a professional for maintenance or repair jobs on your asphalt driveway. A paving contractor can provide the expertise needed to get the job done correctly and efficiently. In addition, a professional can usually offer a warranty on their work that will protect your investment.

Appearance

Asphalt driveways are an economical choice for homeowners and business owners who want a durable, attractive paving material. They are easy to maintain and can last for up to 20 years or more if properly cared for. Regular sweeping, removing ice and snow, and applying sealcoat to the surface can prevent cracks and help extend the lifespan of your asphalt driveway.

While many people think of black asphalt as being a plain, boring driveway option, it offers some great options for aesthetics that can add beauty and charm to any home. In addition to the standard, dark black surface, asphalt pavement is available in a wide variety of colors and textures that can add a unique look to your driveway. Its dark color also helps hide oil stains and other spills, which can be problematic for concrete driveways.

The first layer of your asphalt driveway is the binder course. It is a thick, weight-bearing layer that is installed on top of the prepared runner-crush base. This layer is a crucial part of the entire asphalt construction because it provides the strength and durability for the other layers to follow.

The second layer is the wearing course or surface course. This layer is a thinner and smoother version of the binder course and is commonly referred to as the “topping.” Its smaller aggregate pieces make it a nicer surface to drive on and better at shedding water.

A geo-textile fabric is then placed over the wearing course to keep the underlying layer from mixing with the top layer and creating ruts in the driveway. This is a very important step in the overall construction of an asphalt driveway because it helps keep your asphalt looking nice and strong for a long time.

Once the wearing course has been installed, you will begin laying the asphalt concrete. This is a thicker and more dense version of the wearing course that creates a stronger and longer-lasting paving material for your driveway. Once this is laid, you will compact the material and grade it to ensure that it is level.

Concrete Contractor

The Benefits of Driveway Pavers

Pavers are a durable and long-lasting surface for driveways. They are also safe for cars, easier to repair and more visually appealing than poured concrete.

At first glance, pavers may not seem like the most reliable or sturdy option for a driveway. However, when the appropriate thickness, size and laying pattern are chosen, they become an exceptionally strong and stable material. Contact Driveway Pavers Long Island now!

  1. Durability

Unlike asphalt, concrete or other traditional driveway materials that can crack or disintegrate under the weight of vehicles or inclement weather, pavers offer a long-lasting surface. A well-installed paver driveway should last for 25 to 50 years or more. If a section of your paver driveway becomes damaged due to tree roots, frost heaving or settling, the repair process is quick and inexpensive because they are interlocking. In addition, if you want to change the look of your driveway, it’s easy to add or remove pavers to create a new design.

The durability of pavers depends on the type of material used, installation technique and maintenance regime. Pavers made from first-rate natural stones such as granite, marble and travertine are highly resistant to stains, scratches and wear and tear from vehicle traffic and temperature changes. Porcelain pavers, on the other hand, are a relatively new option that is gaining popularity because of their incredible durability and minimal maintenance requirements. They are crafted from thick non-porous ceramic clay and can withstand heavy traffic, weather conditions and temperature fluctuations without damage.

A good laying pattern is crucial to ensuring the strength of your driveway. A herringbone pattern provides the best interlock and should be used for residential driveways and higher traffic areas. A running bond or basketweave pattern works well for residential driveways, but should not be used for heavier traffic and commercial applications. A herringbone pattern also offers a more classic, traditional look for pavers, but it is not recommended for curved or winding driveways.

When laying brick or concrete pavers, it’s important to follow the proper base preparation procedures to ensure long-term success. Adding a layer of coarse sand and then compacting it before laying the pavers is essential to improving durability and preventing movement of the pavers over time. This process will also reduce the need for future repairs due to frost heaving, settling and root penetration. In addition, adding an edge restraint system is important for preventing lateral movement of the pavers. A reed or perforated drain pipe should also be installed to prevent water pooling and causing erosion and damage to the paving material.

  1. Aesthetics

Driveways are one of the first things guests see when they arrive at your home, so it’s important to make a great impression. A paved driveway looks stylish and sophisticated, and it also offers the added benefit of protecting your car from harsh weather conditions. When choosing a paving material, consider the architectural style of your home and your personal design preferences.

Pavers are available in many different colors, shapes, sizes, and surface textures, so they can be used to create a wide variety of unique designs. For instance, brick pavers can add a classic and rustic charm to homes with traditional colonial architecture. Alternatively, concrete pavers can provide an elegant and modern look. There are even permeable options that allow water to drain through the driveway and reduce runoff while delivering an eye-catching aesthetic.

The laying pattern of your pavers will also play an important role in the overall look and feel of your driveway. For example, a herringbone pattern can work well for most residential driveways and provide an attractive, timeless appearance. On the other hand, an ashlar pattern is perfect for higher traffic areas and can create a bolder, more contemporary look. If you’re looking for a more organic appearance, try using stone pavers that can be laid in a meandering pattern.

Adding greenery to your driveway is another way to elevate the aesthetic and improve curb appeal. Incorporating drought-tolerant plants like agave and fescue can complement your home’s architecture and provide a pleasing contrast to the hardscape. Grass pavers are also an option that can blend hardscaping with natural vegetation, creating a unique and visually appealing appearance.

Before making a final decision on the type of pavers to use for your driveway, it’s important to think about how much traffic you want the area to accommodate and whether or not you want it to be permeable. If you plan on using your driveway for vehicle traffic, a thicker paver is typically better to prevent cracking and chipping over time. A standard concrete paver is ideal for most residential applications, but you can also choose a more durable option such as clay or brick for commercial usage.

  1. Easy Maintenance

As a result of their interlocking design, brick pavers resist weed growth and hold up to weathering. They also resist staining from oil spills, rubber tires, and abrasive chemicals used for de-icing.

Regular sweeping helps keep dirt, debris, leaves, and abrasive materials off the pavers, which prevents them from scratching or damaging the surface. Sweeping also helps prevent stains and keeps the paving stones looking clean, especially if they are sealed. Sealing is recommended for paved surfaces to enhance resistance to stains, but the frequency of application depends on climate and use, so consult professionals or the manufacturer’s recommendations.

If a paving stone is damaged or stained, it can be easily replaced without disrupting the entire driveway or patio, unlike concrete, which requires extensive repair and replacement to correct damage. In addition, pavers are easy to remove and replace individually, which allows you to make small repairs quickly and affordably.

Pavers are also a great option for customizing your home’s landscape and elevating your property’s curb appeal. A wide selection of colors, shapes, and patterns give you limitless possibilities, allowing you to create a one-of-a-kind style that sets your home apart from the rest.

To maintain a fresh appearance, regularly wash your paving stones using a high-pressure garden hose attachment and sprayer nozzle. Alternatively, you can scrub the surface with a soft-bristled brush or push broom and a mild, non-acidic cleaning solution, such as those made by Prosoco. After rinsing, apply a paver sealant according to the manufacturer’s instructions, which will enhance resistance to stains and prolong the lifespan of your paving stones.

A permeable paving system is another alternative to conventional asphalt or concrete, which reduces your home’s carbon footprint by allowing storm water to seep into the ground where it naturally belongs. This helps to relieve sewer and drain issues, while promoting groundwater replenishment and preventing flooding and erosion. When installed by a professional, these systems require minimal maintenance and can be integrated into existing landscaping. They are also extremely cost-effective and can be a good investment for any homeowner.

  1. Cost

The initial cost of driveway pavers can be higher than other options like gravel or paved asphalt. However, they also require less maintenance and last longer than other materials. So, if you’re planning to live in your home for the long-term and plan on using the driveway for a significant amount of time, then pavers may be worth the investment.

Another thing to keep in mind is that a permeable paver system can also help reduce your environmental impact and save money on your water bill. Since these types of pavers allow rainwater to seep through them into the base, it avoids accumulating on top of the surface and draining waste or toxic chemicals that would otherwise run off into sewer systems.

Driveway pavers also have the added benefit of elevating your home’s curb appeal. They come in a variety of shapes, sizes and styles to fit your taste and budget. They can even be combined to create unique patterns like herringbone that gives your driveway a classic style.

There are many different types of pavers available on the market including brick, concrete, stone and plastic. Brick pavers are especially popular because of their durability and timeless beauty. They’re also able to withstand the weight of cars and are easy to repair in the event of damage.

Concrete pavers are similar in many ways to brick pavers. However, they’re typically cheaper than bricks and can be used to achieve a more modern look. Concrete is also a good option for those living in cold climates because it can withstand freezing and thawing temperatures.

Stone pavers are a great choice for those looking to add a natural element to their property. They’re durable, eco-friendly and can withstand the weight of cars and weather changes.

If you’re considering installing a paver driveway, contact a reputable local contractor for an estimate. They’ll help you determine how many pavers you’ll need, calculate the price per square foot and factor in any necessary site prep work. It’s also important to remember that 10% of the paving stones will be wasted during installation so it’s best to have more than you need on hand.

Chimney Sweep

How to Prepare for a Chimney Inspection

Chimneys are the second-most common cause of home fires, and a failing chimney can be very dangerous. Regular inspections by a CSIA certified chimney sweep can help prevent fires and keep your family safe.

A Level 1 chimney inspection checks readily accessible parts of your fireplace and chimney to ensure they’re safe to use as normal. This kind of inspection is usually recommended when no changes have been made to the chimney system. Contact Chimney Inspection Baltimore now!

One of the first things you can do to prepare for a level 1 inspection is ensure that all important documents are up to date. This includes everything from driver’s licenses to medical cards to ELD logs and more. Make sure that your drivers know where to keep these papers and review the list on a regular basis so they can easily access them.

Another thing to do is complete a walk-around inspection of the truck before heading in for the official inspection. Examine mirrors, doors, weather stripping and steps for damage and check that all lights are working correctly. The inspector will also want to examine the engine compartment and any other important areas that are part of the vehicle’s operation.

Keep in mind that these inspections can be lengthy. Be prepared to be there for up to an hour or more and remain calm and polite throughout the entire process. If you do receive a citation during a level 1 inspection, don’t take it personally or get angry. Call our roadside assistance team and we’ll help you file a Data Q dispute so you can have the citation hashed out elsewhere.

Level 2 Inspection

A level 2 inspection is a more detailed and thorough assessment of your chimney system. It can also help identify unseen repairs that may be needed in the future. The steps of a level 2 inspection typically include checking inside the attic, basement, and crawl spaces, looking for proper clearance from combustible building materials, scanning the flue using a specialized video camera that allows the chimney sweep to get the closest look possible, and providing a detailed report showing the findings.

Chimney sweeps recommend a level two inspection for many reasons, including after making a change to the fireplace system, such as switching fuel sources or installing a new insert. Also, a level two inspection is required if the chimney has experienced any kind of damage or structural problems. Lastly, a level two inspection is recommended before purchasing or selling a home, as it can help reveal issues that could be costly for the buyer down the road.

Choosing the General Inspection Level impacts statistical confidence in your inspection results and your costs, so it’s important to choose the right one for your situation. The AQL/ANSI tables are helpful tools that can help you select the best level for your application.

The levels are determined by the level of testing required for each item on your inspection checklist. For example, if you need to inspect all of the pillows in your product but are hesitant to do so because of frequent quality issues with a certain supplier, consider using General II. This will reduce your sample size, which can lower the cost of your inspection. Regardless of which General Inspection Level you use, it’s important to follow legal requirements and your manufacturer’s recommendations. This will ensure that your inspector provides you with the most accurate and complete results. It will also give you peace of mind that your chimney system is safe and sound for the long term.

Level 3 Inspection

The best way to avoid a level 3 inspection is to work according to the rules. Keeping your driver’s license and medical card up to date will help ensure that you are ready to pass an inspection and not put out of service for any violations or citations.

If you are working with a new supplier, or if your long-term supplier has been having quality issues, consider using General III until they have the necessary processes in place to make it down to General II. This will give you more confidence in the inspection results and will save you time and money.Level 3 Inspection

Level 3 inspections are the most thorough. They include everything in a Level 1 inspection plus a visual examination of the accessible portions of the chimney interior and exterior including attics, crawl spaces and basements. They also address proper clearances from combustible materials in accessible locations. A video scan of the flue is also performed. This is the most invasive type of inspection, but it’s often required when a serious hazard is suspected. This level of inspection is generally recommended when changes to the chimney system are being considered, upon sale or transfer of property, or if an operation malfunction has occurred.

The level of inspection that a home requires can be determined by an expert chimney sweep. This will take into consideration the age of the chimney, its condition and the use of fuel being burned. For example, a wood burning fireplace typically has a higher risk of chimney fire than an oil or gas-burning unit. Chimney experts will recommend a specific level of inspection based on this information.

These levels of inspection were formerly left to the discretion of the chimney service technician, but were recently made part of the national standard NFPA 211 (Standard for Chimneys, Fireplaces, Vents and Solid Fuel Burning Appliances). The new standardized levels allow homeowners to have more confidence that their chimney has been properly evaluated and deemed safe by an industry professional.

While many people think of chimneys and fireplaces as decorative additions to the home, they serve a very important purpose in ensuring that homes are safe for their residents. Having regular inspections done can help prevent expensive repairs, fires and other chimney-related issues in the future.

Having regular chimney inspections by a professional can also help keep the home clean and free of flammable debris, which in turn helps keep the fireplace functioning properly. It’s easy to put off getting an inspection done, but it’s important that these appointments be made, as early detection can mean less damage and fewer costly repairs down the road. In addition, the earlier problems are spotted, the easier they can be addressed and prevented.

Level 4 Inspection

A well-functioning fireplace is essential for many homeowners, especially as the winter months approach. However, it is easy to overlook your chimney and neglect regular maintenance, leading to damage and other issues that may be very dangerous. Fortunately, you can prevent these problems by getting regular inspections and taking care of your fireplace.

During a Level 1 inspection, a certified chimney service technician looks at the readily accessible components of your venting system, including your flue and chimney structure. They look for blockages, creosote accumulation and deposits of other combustible materials. They will also verify that your chimney is in good condition and working properly.

While a Level 1 inspection may be sufficient for most homes, there are occasions when a more thorough evaluation is necessary. If a problem is suspected or if the technician notices certain signs of deterioration, such as water stains on the exterior or cracking and spalling of the bricks in the chimney, a more detailed evaluation is needed.

During this evaluation, the chimney service professional will take all of the steps involved in a Level 2 inspection but also inspect other areas of the home that are in proximity to your fireplace and chimney such as attics, crawl spaces and basements. They will evaluate these areas to ensure that the chimney has adequate clearance from combustible materials and will check to see if there are any gaps or cracks in the mortar joints.

When a problem is discovered during this examination, a Level 3 inspection will be performed. This evaluation is the most invasive and thorough of the three levels and involves removing parts of the chimney to get a closer look at internal structures. This is usually done when a serious hazard has been detected or if special tools are required to reach concealed areas of the chimney and flue.

Although a chimney inspection is important for all homeowners, it is especially vital to those who use their fireplaces frequently. This type of inspection can help identify a variety of problems, from minor to major, and determine whether they are safe to continue using your chimney or if it is time for repairs.