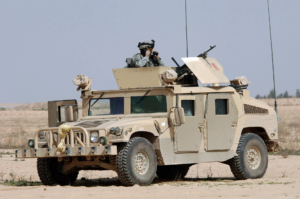
Concrete Contractor

The Benefits of Driveway Pavers

Pavers are a durable and long-lasting surface for driveways. They are also safe for cars, easier to repair and more visually appealing than poured concrete.

At first glance, pavers may not seem like the most reliable or sturdy option for a driveway. However, when the appropriate thickness, size and laying pattern are chosen, they become an exceptionally strong and stable material. Contact Driveway Pavers Long Island now!

  1. Durability

Unlike asphalt, concrete or other traditional driveway materials that can crack or disintegrate under the weight of vehicles or inclement weather, pavers offer a long-lasting surface. A well-installed paver driveway should last for 25 to 50 years or more. If a section of your paver driveway becomes damaged due to tree roots, frost heaving or settling, the repair process is quick and inexpensive because they are interlocking. In addition, if you want to change the look of your driveway, it’s easy to add or remove pavers to create a new design.

The durability of pavers depends on the type of material used, installation technique and maintenance regime. Pavers made from first-rate natural stones such as granite, marble and travertine are highly resistant to stains, scratches and wear and tear from vehicle traffic and temperature changes. Porcelain pavers, on the other hand, are a relatively new option that is gaining popularity because of their incredible durability and minimal maintenance requirements. They are crafted from thick non-porous ceramic clay and can withstand heavy traffic, weather conditions and temperature fluctuations without damage.

A good laying pattern is crucial to ensuring the strength of your driveway. A herringbone pattern provides the best interlock and should be used for residential driveways and higher traffic areas. A running bond or basketweave pattern works well for residential driveways, but should not be used for heavier traffic and commercial applications. A herringbone pattern also offers a more classic, traditional look for pavers, but it is not recommended for curved or winding driveways.

When laying brick or concrete pavers, it’s important to follow the proper base preparation procedures to ensure long-term success. Adding a layer of coarse sand and then compacting it before laying the pavers is essential to improving durability and preventing movement of the pavers over time. This process will also reduce the need for future repairs due to frost heaving, settling and root penetration. In addition, adding an edge restraint system is important for preventing lateral movement of the pavers. A reed or perforated drain pipe should also be installed to prevent water pooling and causing erosion and damage to the paving material.

  1. Aesthetics

Driveways are one of the first things guests see when they arrive at your home, so it’s important to make a great impression. A paved driveway looks stylish and sophisticated, and it also offers the added benefit of protecting your car from harsh weather conditions. When choosing a paving material, consider the architectural style of your home and your personal design preferences.

Pavers are available in many different colors, shapes, sizes, and surface textures, so they can be used to create a wide variety of unique designs. For instance, brick pavers can add a classic and rustic charm to homes with traditional colonial architecture. Alternatively, concrete pavers can provide an elegant and modern look. There are even permeable options that allow water to drain through the driveway and reduce runoff while delivering an eye-catching aesthetic.

The laying pattern of your pavers will also play an important role in the overall look and feel of your driveway. For example, a herringbone pattern can work well for most residential driveways and provide an attractive, timeless appearance. On the other hand, an ashlar pattern is perfect for higher traffic areas and can create a bolder, more contemporary look. If you’re looking for a more organic appearance, try using stone pavers that can be laid in a meandering pattern.

Adding greenery to your driveway is another way to elevate the aesthetic and improve curb appeal. Incorporating drought-tolerant plants like agave and fescue can complement your home’s architecture and provide a pleasing contrast to the hardscape. Grass pavers are also an option that can blend hardscaping with natural vegetation, creating a unique and visually appealing appearance.

Before making a final decision on the type of pavers to use for your driveway, it’s important to think about how much traffic you want the area to accommodate and whether or not you want it to be permeable. If you plan on using your driveway for vehicle traffic, a thicker paver is typically better to prevent cracking and chipping over time. A standard concrete paver is ideal for most residential applications, but you can also choose a more durable option such as clay or brick for commercial usage.

  1. Easy Maintenance

As a result of their interlocking design, brick pavers resist weed growth and hold up to weathering. They also resist staining from oil spills, rubber tires, and abrasive chemicals used for de-icing.

Regular sweeping helps keep dirt, debris, leaves, and abrasive materials off the pavers, which prevents them from scratching or damaging the surface. Sweeping also helps prevent stains and keeps the paving stones looking clean, especially if they are sealed. Sealing is recommended for paved surfaces to enhance resistance to stains, but the frequency of application depends on climate and use, so consult professionals or the manufacturer’s recommendations.

If a paving stone is damaged or stained, it can be easily replaced without disrupting the entire driveway or patio, unlike concrete, which requires extensive repair and replacement to correct damage. In addition, pavers are easy to remove and replace individually, which allows you to make small repairs quickly and affordably.

Pavers are also a great option for customizing your home’s landscape and elevating your property’s curb appeal. A wide selection of colors, shapes, and patterns give you limitless possibilities, allowing you to create a one-of-a-kind style that sets your home apart from the rest.

To maintain a fresh appearance, regularly wash your paving stones using a high-pressure garden hose attachment and sprayer nozzle. Alternatively, you can scrub the surface with a soft-bristled brush or push broom and a mild, non-acidic cleaning solution, such as those made by Prosoco. After rinsing, apply a paver sealant according to the manufacturer’s instructions, which will enhance resistance to stains and prolong the lifespan of your paving stones.

A permeable paving system is another alternative to conventional asphalt or concrete, which reduces your home’s carbon footprint by allowing storm water to seep into the ground where it naturally belongs. This helps to relieve sewer and drain issues, while promoting groundwater replenishment and preventing flooding and erosion. When installed by a professional, these systems require minimal maintenance and can be integrated into existing landscaping. They are also extremely cost-effective and can be a good investment for any homeowner.

  1. Cost

The initial cost of driveway pavers can be higher than other options like gravel or paved asphalt. However, they also require less maintenance and last longer than other materials. So, if you’re planning to live in your home for the long-term and plan on using the driveway for a significant amount of time, then pavers may be worth the investment.

Another thing to keep in mind is that a permeable paver system can also help reduce your environmental impact and save money on your water bill. Since these types of pavers allow rainwater to seep through them into the base, it avoids accumulating on top of the surface and draining waste or toxic chemicals that would otherwise run off into sewer systems.

Driveway pavers also have the added benefit of elevating your home’s curb appeal. They come in a variety of shapes, sizes and styles to fit your taste and budget. They can even be combined to create unique patterns like herringbone that gives your driveway a classic style.

There are many different types of pavers available on the market including brick, concrete, stone and plastic. Brick pavers are especially popular because of their durability and timeless beauty. They’re also able to withstand the weight of cars and are easy to repair in the event of damage.

Concrete pavers are similar in many ways to brick pavers. However, they’re typically cheaper than bricks and can be used to achieve a more modern look. Concrete is also a good option for those living in cold climates because it can withstand freezing and thawing temperatures.

Stone pavers are a great choice for those looking to add a natural element to their property. They’re durable, eco-friendly and can withstand the weight of cars and weather changes.

If you’re considering installing a paver driveway, contact a reputable local contractor for an estimate. They’ll help you determine how many pavers you’ll need, calculate the price per square foot and factor in any necessary site prep work. It’s also important to remember that 10% of the paving stones will be wasted during installation so it’s best to have more than you need on hand.

Chimney Sweep

How to Prepare for a Chimney Inspection

Chimneys are the second-most common cause of home fires, and a failing chimney can be very dangerous. Regular inspections by a CSIA certified chimney sweep can help prevent fires and keep your family safe.

A Level 1 chimney inspection checks readily accessible parts of your fireplace and chimney to ensure they’re safe to use as normal. This kind of inspection is usually recommended when no changes have been made to the chimney system. Contact Chimney Inspection Baltimore now!

One of the first things you can do to prepare for a level 1 inspection is ensure that all important documents are up to date. This includes everything from driver’s licenses to medical cards to ELD logs and more. Make sure that your drivers know where to keep these papers and review the list on a regular basis so they can easily access them.

Another thing to do is complete a walk-around inspection of the truck before heading in for the official inspection. Examine mirrors, doors, weather stripping and steps for damage and check that all lights are working correctly. The inspector will also want to examine the engine compartment and any other important areas that are part of the vehicle’s operation.

Keep in mind that these inspections can be lengthy. Be prepared to be there for up to an hour or more and remain calm and polite throughout the entire process. If you do receive a citation during a level 1 inspection, don’t take it personally or get angry. Call our roadside assistance team and we’ll help you file a Data Q dispute so you can have the citation hashed out elsewhere.

Level 2 Inspection

A level 2 inspection is a more detailed and thorough assessment of your chimney system. It can also help identify unseen repairs that may be needed in the future. The steps of a level 2 inspection typically include checking inside the attic, basement, and crawl spaces, looking for proper clearance from combustible building materials, scanning the flue using a specialized video camera that allows the chimney sweep to get the closest look possible, and providing a detailed report showing the findings.

Chimney sweeps recommend a level two inspection for many reasons, including after making a change to the fireplace system, such as switching fuel sources or installing a new insert. Also, a level two inspection is required if the chimney has experienced any kind of damage or structural problems. Lastly, a level two inspection is recommended before purchasing or selling a home, as it can help reveal issues that could be costly for the buyer down the road.

Choosing the General Inspection Level impacts statistical confidence in your inspection results and your costs, so it’s important to choose the right one for your situation. The AQL/ANSI tables are helpful tools that can help you select the best level for your application.

The levels are determined by the level of testing required for each item on your inspection checklist. For example, if you need to inspect all of the pillows in your product but are hesitant to do so because of frequent quality issues with a certain supplier, consider using General II. This will reduce your sample size, which can lower the cost of your inspection. Regardless of which General Inspection Level you use, it’s important to follow legal requirements and your manufacturer’s recommendations. This will ensure that your inspector provides you with the most accurate and complete results. It will also give you peace of mind that your chimney system is safe and sound for the long term.

Level 3 Inspection

The best way to avoid a level 3 inspection is to work according to the rules. Keeping your driver’s license and medical card up to date will help ensure that you are ready to pass an inspection and not put out of service for any violations or citations.

If you are working with a new supplier, or if your long-term supplier has been having quality issues, consider using General III until they have the necessary processes in place to make it down to General II. This will give you more confidence in the inspection results and will save you time and money.Level 3 Inspection

Level 3 inspections are the most thorough. They include everything in a Level 1 inspection plus a visual examination of the accessible portions of the chimney interior and exterior including attics, crawl spaces and basements. They also address proper clearances from combustible materials in accessible locations. A video scan of the flue is also performed. This is the most invasive type of inspection, but it’s often required when a serious hazard is suspected. This level of inspection is generally recommended when changes to the chimney system are being considered, upon sale or transfer of property, or if an operation malfunction has occurred.

The level of inspection that a home requires can be determined by an expert chimney sweep. This will take into consideration the age of the chimney, its condition and the use of fuel being burned. For example, a wood burning fireplace typically has a higher risk of chimney fire than an oil or gas-burning unit. Chimney experts will recommend a specific level of inspection based on this information.

These levels of inspection were formerly left to the discretion of the chimney service technician, but were recently made part of the national standard NFPA 211 (Standard for Chimneys, Fireplaces, Vents and Solid Fuel Burning Appliances). The new standardized levels allow homeowners to have more confidence that their chimney has been properly evaluated and deemed safe by an industry professional.

While many people think of chimneys and fireplaces as decorative additions to the home, they serve a very important purpose in ensuring that homes are safe for their residents. Having regular inspections done can help prevent expensive repairs, fires and other chimney-related issues in the future.

Having regular chimney inspections by a professional can also help keep the home clean and free of flammable debris, which in turn helps keep the fireplace functioning properly. It’s easy to put off getting an inspection done, but it’s important that these appointments be made, as early detection can mean less damage and fewer costly repairs down the road. In addition, the earlier problems are spotted, the easier they can be addressed and prevented.

Level 4 Inspection

A well-functioning fireplace is essential for many homeowners, especially as the winter months approach. However, it is easy to overlook your chimney and neglect regular maintenance, leading to damage and other issues that may be very dangerous. Fortunately, you can prevent these problems by getting regular inspections and taking care of your fireplace.

During a Level 1 inspection, a certified chimney service technician looks at the readily accessible components of your venting system, including your flue and chimney structure. They look for blockages, creosote accumulation and deposits of other combustible materials. They will also verify that your chimney is in good condition and working properly.

While a Level 1 inspection may be sufficient for most homes, there are occasions when a more thorough evaluation is necessary. If a problem is suspected or if the technician notices certain signs of deterioration, such as water stains on the exterior or cracking and spalling of the bricks in the chimney, a more detailed evaluation is needed.

During this evaluation, the chimney service professional will take all of the steps involved in a Level 2 inspection but also inspect other areas of the home that are in proximity to your fireplace and chimney such as attics, crawl spaces and basements. They will evaluate these areas to ensure that the chimney has adequate clearance from combustible materials and will check to see if there are any gaps or cracks in the mortar joints.

When a problem is discovered during this examination, a Level 3 inspection will be performed. This evaluation is the most invasive and thorough of the three levels and involves removing parts of the chimney to get a closer look at internal structures. This is usually done when a serious hazard has been detected or if special tools are required to reach concealed areas of the chimney and flue.

Although a chimney inspection is important for all homeowners, it is especially vital to those who use their fireplaces frequently. This type of inspection can help identify a variety of problems, from minor to major, and determine whether they are safe to continue using your chimney or if it is time for repairs.

General Contractor

The Importance of Proper Dock Restoration

A well-maintained dock can add value to your property. However, a dock is not indestructible. It must be inspected regularly for cracks, rotting areas, and other issues. For more information just visit Dock Lifts Charleston SC to proceed.

If you live on a lake or pond, your springtime maintenance rituals include checking out the condition of your dock and boat lift. This ipe dock and boathouse needed a little love after 13 years on Lake.

Your dock has to withstand a lot of stress. Whether it sits next to a lake or the ocean, powerful waves constantly batter it day and night, eventually damaging the dock structure. Detecting and dealing with any damage early on can help you save time and money and prevent injuries to your family and friends who use the dock.

Whether your dock is made of wood or steel, you should regularly inspect it to look for signs that it needs repairs. During these inspections, check for damaged planks and other structural components. In addition, make sure to fix any loose screws or nails.

You should also check the deck surface for any rust or stains. Mix your cleaning solution according to the instructions and spray it over the entire dock, focusing on areas with heavy buildup or stains. Scrub any affected area with a brush and rinse it with water afterward. You can also pressure wash your dock if necessary. Keep the nozzle at least a foot away from the wood to avoid damaging it.

Another common repair for docks is fixing the rusted hardware that holds the structure together. If left unchecked, this can result in the loss of structural integrity and cause unsafe conditions for anyone who uses the dock. If the problem is limited to a few pieces of hardware, it may be possible to repair them.

If the rusted hardware is beyond repair, it’s likely time for a new dock. In such cases, it’s a good idea to consult a professional with the right skills and experience in replacing the dock components.

The best way to maintain the lifespan of your dock is to have it regularly inspected by an experienced professional. In addition to revealing any structural weaknesses, the expert can advise you when it’s time for repairs or replacement. In addition, the experienced professionals can guide you through obtaining the required permits. For example, if your dock is in a sensitive area, you may need to submit additional documentation to the state.

The foundation of a dock is crucial to its stability. Without a strong foundation, the entire structure is at risk of collapsing. Homeowners should always consult a professional before repairing or replacing a dock foundation. A professional can help homeowners determine whether repairing the foundation is the best option or installing a new one would be more cost-effective.

Over time, water and sunlight can cause wood on docks to deteriorate. Eventually, this can lead to splinters or rotting, creating unsafe conditions for people using the dock. Homeowners should check the decks and railings of their dock regularly for signs of rot or damage. If there are any issues, they must be repaired as soon as possible.

In addition to wood rot, docks may also experience problems with the metal components of their structure. Because they are exposed to salt water, metal parts can rust over time. While some rust spots might be easy to patch up, if significant portions of a dock are oxidized, it’s likely time for a replacement.

A dock is a useful addition to any property near a body of water. Many people use it to enjoy the water and protect their boats. Unfortunately, it’s not indestructible and requires regular maintenance to keep it safe.

Keeping up with dock maintenance can increase the lifespan of your dock and reduce the need for repairs or replacement. Regular inspections can catch small problems before they become major ones requiring a complete replacement. A professional can inspect a dock and provide routine services like cleaning, patching, restaining, checking connections, and fixing rusty parts.

Homeowners should look for critical signs of a damaged dock, like extended calcification, dulled metal parts, mold and slime, bends, splitters, and cracks on the fascia. They should also consider hiring a local dock builder for any rattling sounds they hear as they walk around the structure. These are a sign that the metal fasteners (like screws, bolts, rivets, studs, and anchors) are loosening or have loosened, which can be dangerous for anyone using the dock.

Wooden docks can experience rot and decay over time, especially in constant contact with water. Even with proper care, wooden dock components can eventually turn from a beautiful golden brown to a dingy grey or greenish-black color. This is a normal occurrence and can be repaired with new lumber, but if rotting becomes a major problem in some areas, it’s likely time for a replacement dock.

Inspecting and repairing your entire dock before you use it can help prevent serious problems. A professional inspection costs between $50 and $100, during which a dock expert will visit the site to look at different parts of the structure, including pilings, railings, and decks. They’ll also inspect the dock’s frame and search for issues like cracks and rotting sections.

It’s not uncommon for fungus from the water to create dry rot within wooden boat dock materials, leading them to decay and crumble over time. In most cases, a small amount of pollution in a few isolated areas will be fine with the function and safety of the dock. But if you’re consistently replacing sections of the dock due to rot, it’s time for a replacement.

While a professional inspection is recommended, you can inspect your dock regularly to catch potential problems before they become serious. Check for signs of damage or rot daily, and clean the structure frequently to avoid algae buildups.

Rust is another common cause of dock degradation, particularly if the dock is metal. Most docks are built using galvanized or coated metal for screws and supports, which are designed to protect against rust. But rust is still possible, especially when the metal is exposed to the elements and rainy weather. Rust can be repaired with little effort, but in some cases, you may have to replace entire damaged or rusted sections.

If your dock is old and needs repair, consider upgrading to composite materials that don’t rust or deteriorate as easily as wooden ones. These docks are more expensive but can add value to your property and are long-lasting and durable.

Any structure exposed to water will experience some form of wear and tear over time, especially if it is regularly used. Docks are no exception, and as a result, they can develop issues like rust, rot, and foundation damage. If you notice any of these issues with your dock, it is important to get them repaired as quickly as possible to prevent further damage and ensure safety.

Metal doesn’t mix well with water, so it’s no surprise that docks with many metal parts can start to rust over time. Rust can weaken the structural integrity of a dock, so it’s important to check frequently for signs of rust. If you notice rust formations on the dock platform or supports, contact a marine contractor immediately to schedule repairs.

Wood rot is another common issue that can cause damage to a dock. This fungus can cause the wood to decay and fall apart, requiring a complete dock replacement.

You can usually spot rotting wood by noticing shrunken planks or dark areas on the dock. In addition, you may also hear rattling noises from the dock as the boards move around, which is a sign that they need to be fixed immediately.

A professional should be able to replace the rotting wood with treated wood, which will help the dock resist future rot and fungal damage. However, if the rot is in the support beams, the entire dock will likely need to be replaced.

A dock can be an excellent addition to your property, but it’s important to watch for signs of damage or deterioration. Any ignored issues can turn into dangerous situations, so it’s essential to conduct regular inspections of your dock to spot problems early and have them repaired as soon as possible.

General Contractor

Boundary Walls – A Statement of Sovereignty

Boundary Walls deter trespassing and provide privacy for your home. They also prevent pollution, noise, and wild animals from entering the property, creating a safe and healthy living environment.

Metal boundary walls are a popular option because they offer durability and security. They can be customized to match the design of your home. You can visit this Website for more information.

Boundary walls are more than just a physical barrier between homes, they are a statement of sovereignty and a sign that your home and property are off limits to anyone without express permission. Whether to deter nosy neighbors or unwelcome visitors, boundary walls are an effective security measure that will provide peace of mind and protection for your family and belongings.

While many homeowners erect boundary walls as a cost-effective solution, ensuring that your wall is built with quality and safety in mind is important. It should be able to resist lateral loads like wind and be strong enough to prevent it from falling or collapsing.

A poorly constructed or damaged boundary wall can become a liability for you and your neighbors. In a worst-case scenario, if the wall collapses, it may affect nearby buildings, roads, and other infrastructure, making evacuation planning and rescue difficult. As a result, you must invest in a well-constructed boundary wall and keep up to date with its maintenance.

In addition to structural integrity, you should also consider the landscaping features of your boundary wall. If it is overgrown with trees, shrubs, or other vegetation, it can weaken the structure and potentially fall. Similarly, poor drainage around the base of your boundary wall can cause soil to build up behind the wall, leading to structural damage.

Ultimately, you should seek professional advice when building or maintaining your boundary wall to ensure stability. It is a good idea to involve your corporate body or homeowner’s association to ensure the wall is safe for all residents. You can effectively address a leaning boundary wall by prioritizing safety, seeking professional advice, and keeping open communication.

You can build your boundary wall to different heights depending on your location and landscape. However, it is important to remember that if you live in a suburban area, you may need to consider your neighbor’s ‘Right to Light’ and minimize the tunnel effect of overbearing boundary walls. For this reason, it is a good idea to consult your local council to see the maximum boundary wall height for your specific area.

A boundary wall not only defines the boundaries of a property but also enhances your house’s aesthetics. It can be designed to reflect your style and personality, ensuring that it adds to the beauty of your home’s exterior. A unique boundary wall design can also deter unwanted visitors and increase the privacy of your yard.

To create an attractive and unique boundary wall, use different materials, add lighting elements, and incorporate water features into the design. Lighting can make the walls more visible and attractive at night, while water features add a soothing and relaxing element to the environment. Moreover, you can incorporate other design elements into your boundary wall, such as decorative plants and trees, flowers, bricks, or unique shapes.

You can even hire professional painters to paint murals on the boundary walls of your house. These can include beautiful designs of flowers, skylines, mandalas, your favorite personalities, or a day in your life. These will give your simple house boundary wall a distinctive look that will impress your guests and passersby.

Adding a gate to your boundary wall is another way to increase its functionality and aesthetics. Gates are available in various styles and sizes, so you can choose one that matches your home’s architectural style. Besides, gates can be used to provide security and prevent trespassing. You can also install a pond or fountain to attract birds and other animals to your home, reducing noise pollution and providing tranquility.

People notice your property’s front and boundary walls, so it’s important to choose a design that complements your home’s architectural style. You can also select a fence that blends in with your backyard, creating a cohesive look and feel for your whole property.

A well-designed boundary wall can enhance the appearance of your home and increase its value. It can also protect your children and pets from traffic, noise pollution, and other external factors that could cause harm to them. Moreover, it can help you avoid conflicts with your neighbors and improve the quality of your neighborhood.

A well-constructed boundary wall can reduce the impact of external noise. This creates a more tranquil and secluded living environment. These walls can also be used as a plant support structure and enhance the home’s aesthetics. They can be built in various styles and available in many materials.

A concrete boundary wall is the most effective and durable option for reducing noise. These walls are built using pre-cast sections that can be installed quickly and easily. They can be made at various heights and are designed to provide good acoustic performance. Concrete boundary walls are also more flexible than other types of walls, which allows them to absorb more sound energy. They can also be curved or angled to minimize the effect of reflections.

Another type of boundary wall is a wood fence. These fences are often constructed using wooden planks and logs and may be treated for durability. Wood boundary walls offer a natural and rustic look and are suitable for many settings. They are also easy to build and can be customized with textures and finishes. However, they are susceptible to weathering and require frequent maintenance.

Boundary walls can be cladded with stone, providing an attractive appearance and increasing a home’s overall value. This is especially true for a property located in a busy area. In addition, a boundary wall can help protect the surrounding trees and landscapes from damage caused by vehicular traffic.

While noise barriers effectively reduce noise, it is important to consider the overall noise levels and other factors when installing one. For example, it is necessary to consider the traffic on a road and the distance of residences from the source. Noise levels can also be reduced by reducing the speed of vehicles traveling through a neighborhood.

In addition to reducing noise, a boundary wall can also improve the visual privacy of a residence. This can be accomplished by installing a wall taller than the existing fence or adding decorative elements to the existing structure.

A well-designed, high-quality boundary wall can add significant value to your home. It creates a safe environment for children and pets, provides an aesthetic feature, and makes your property stand out from the neighbors’. If you are considering selling your home, a boundary wall will also help increase your property’s resale value.

A properly constructed and maintained boundary wall is a great way to define your property boundaries and prevent any issues with neighboring properties. It can also reduce noise pollution from nearby roads and neighboring homes, creating a quieter and more peaceful living space.

Boundary walls can be constructed from various materials, depending on the style and purpose of the wall. Concrete is often the preferred choice as it offers stability and durability. However, other options include stone and timber, which are highly durable and attractive.

If you plan to build a new boundary wall, you should consult with your neighbor and discuss the issue. If you and your neighbor cannot agree on the boundary line’s location, you may need to contact a chartered surveyor for assistance. A chartered surveyor can help to determine the exact position of the boundary line using old records and deeds and draft a party wall agreement between you and your neighbor.

Once the location of the boundary wall has been determined, it is important to dig a trench to prepare for the wall’s foundation. This trench must be at least 1.5 times the width of the wall and deep enough to support the foundation. The soil type will also influence the depth required for the foundation, as some soil types require more depth than others.

After the foundation has been completed, the next step is to install the wall. This can be done with the help of a professional or by following the instructions in your building manual. Once the wall has been installed, you can plant and landscape around it to create a beautiful and functional outdoor space.